
What's New in the SWT Racing Shop
Updated 01.14.07
01.14.06
It has been a very long time since an update. Work on the Vega has continued, although it takes a bit longer to get things done than it used to. Well, what can I say. . .being a parent takes a lot of your free time away! Little Zara, now at 20 months old, has been to the dragstrip five times already, and can recognize my car on some of my racing videos. Think she'll be into cars when she gets older?
Here's a current pic of the little one:
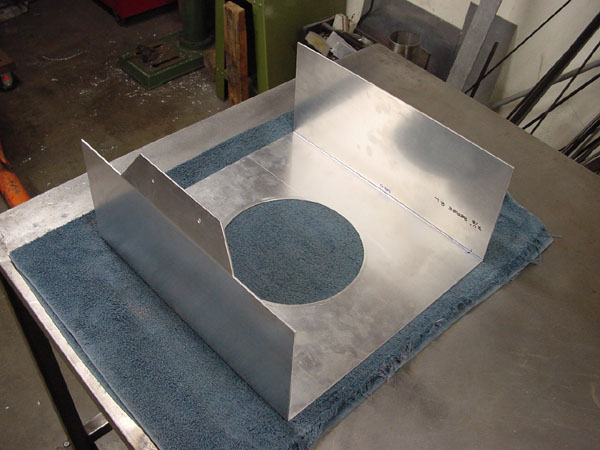
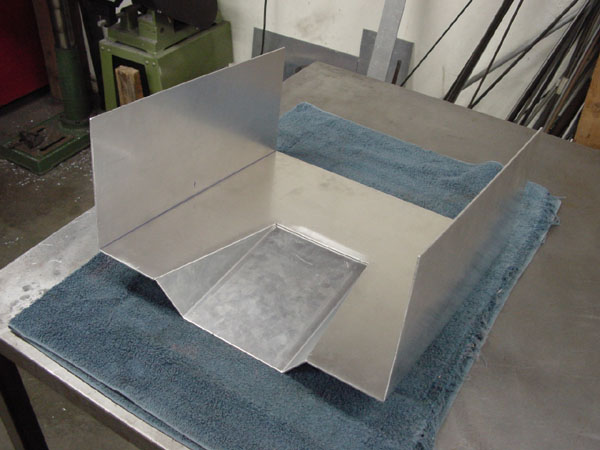
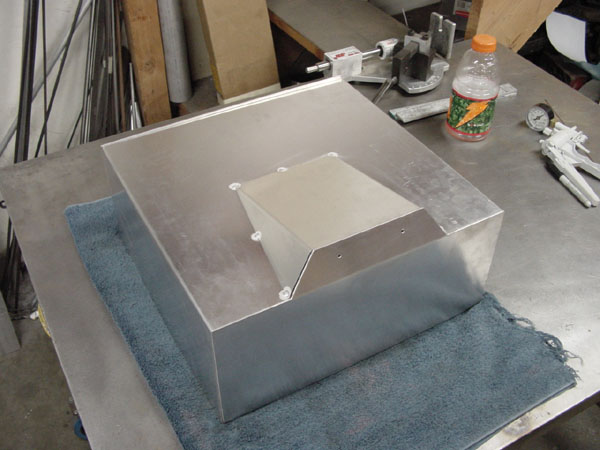
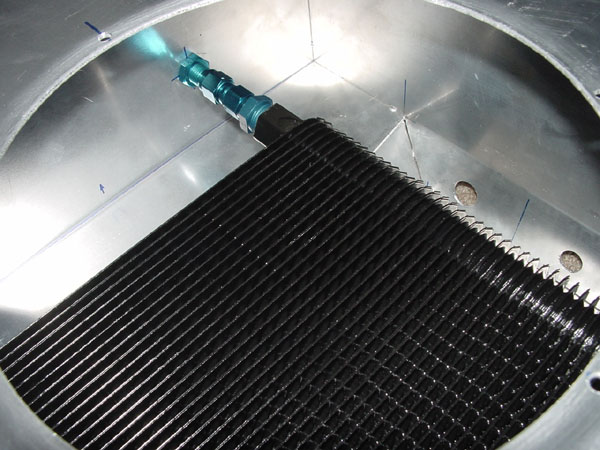
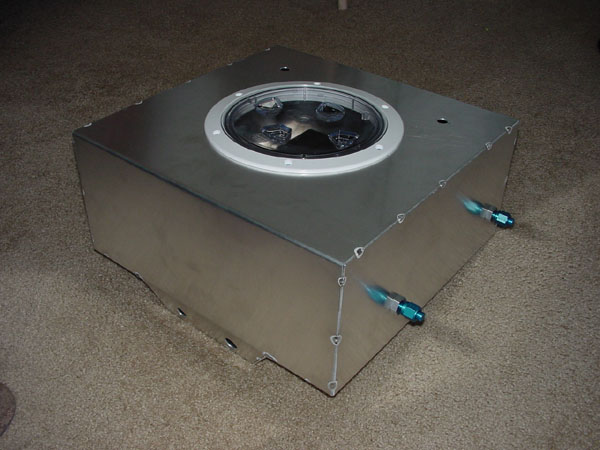
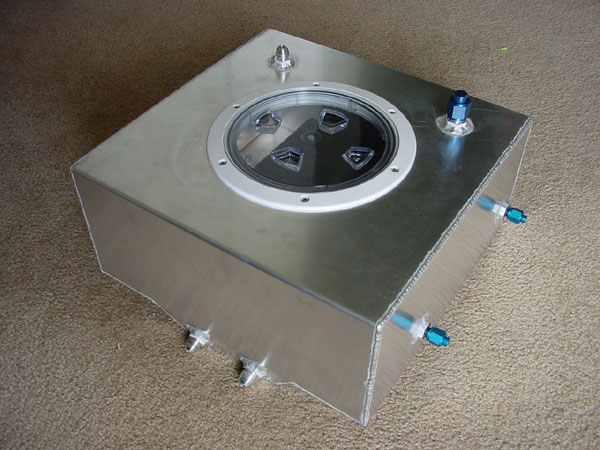
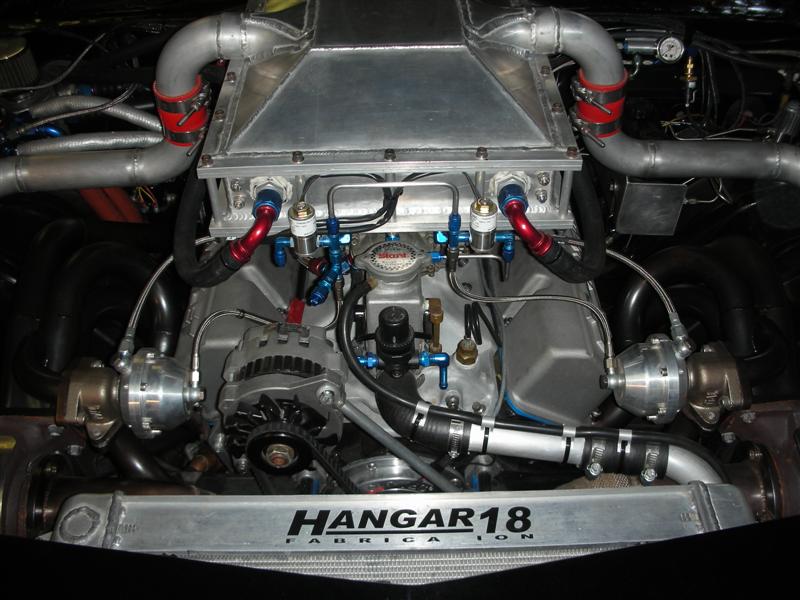
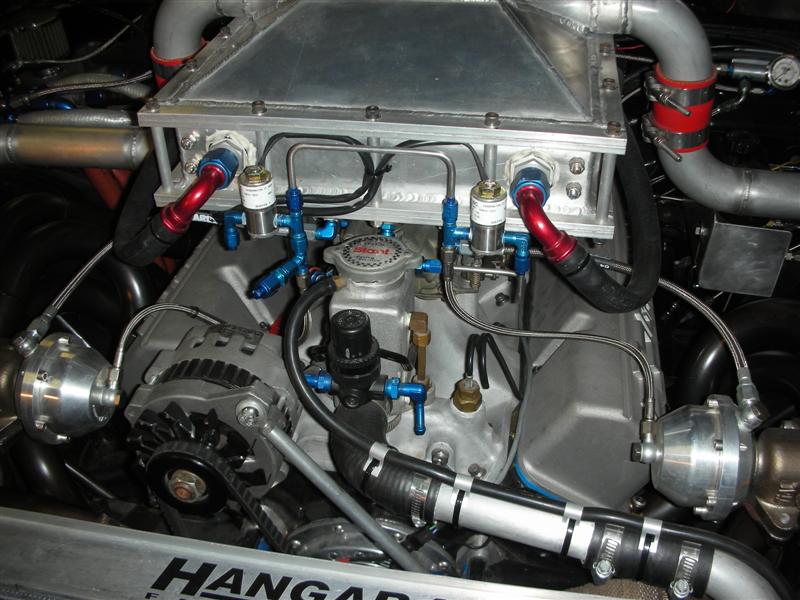
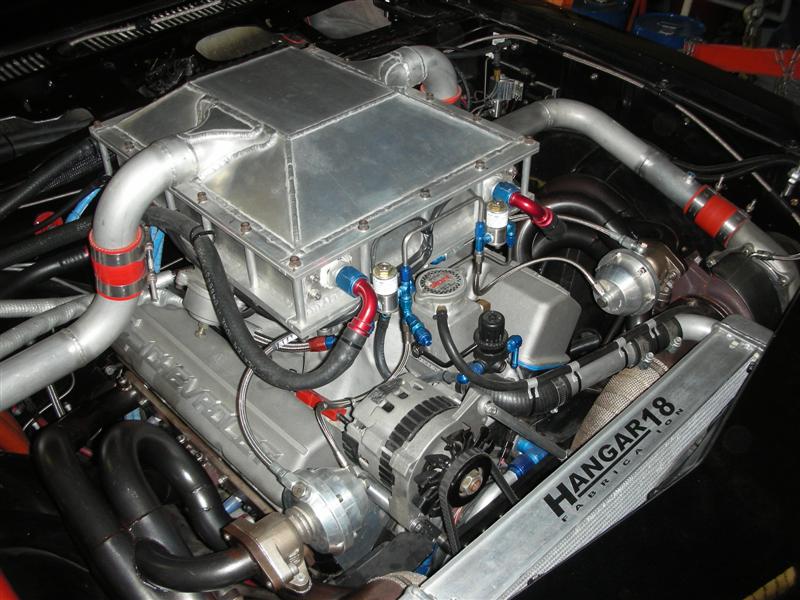
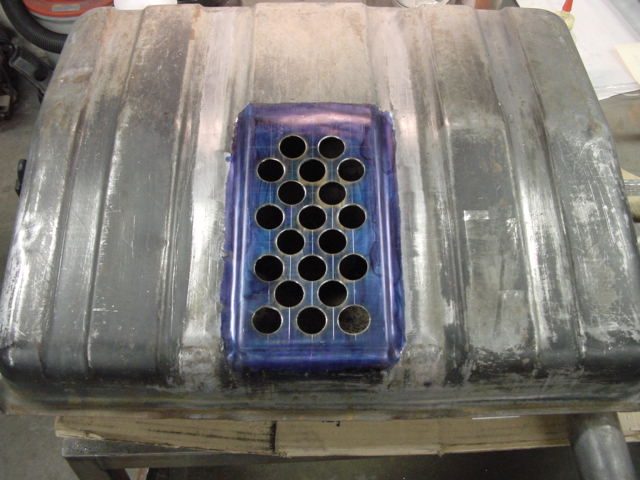
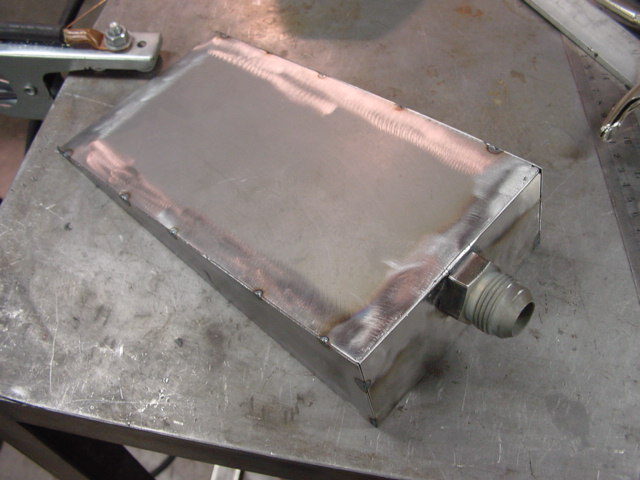
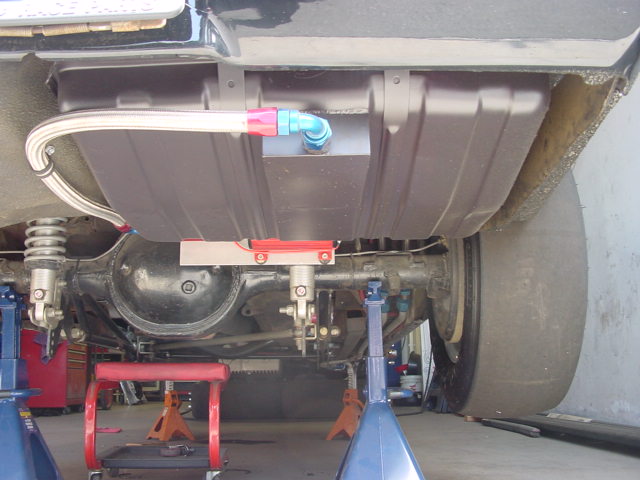
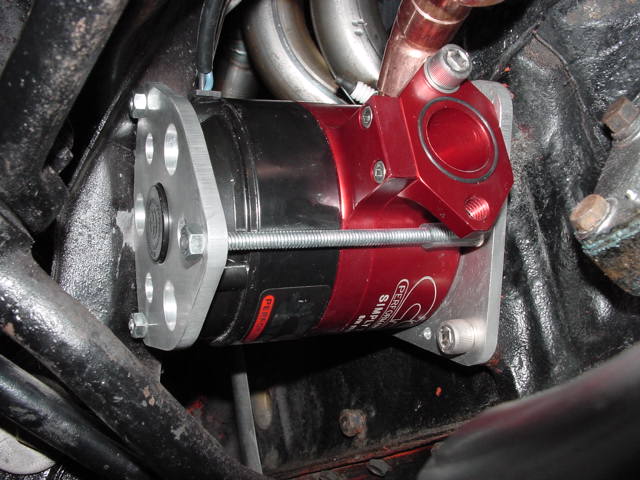
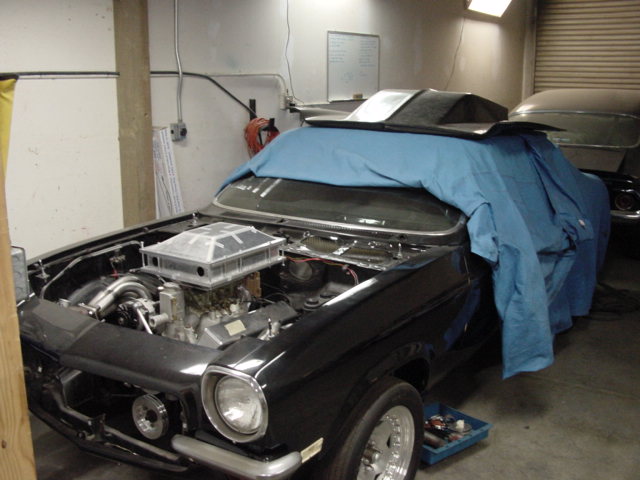
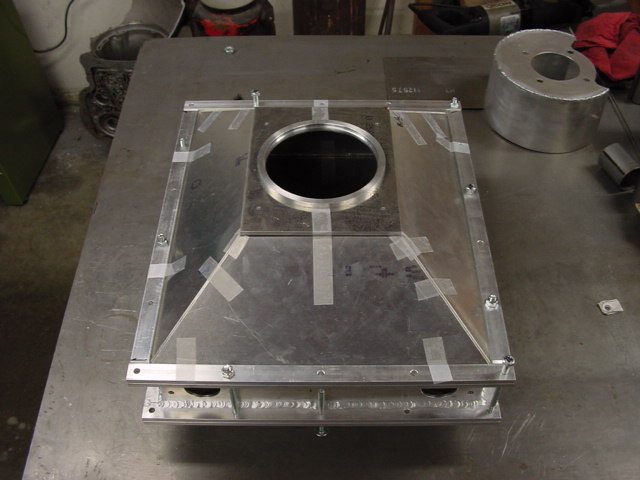
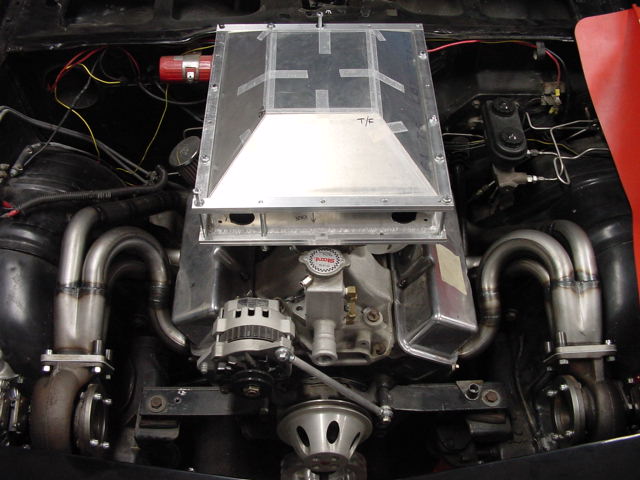
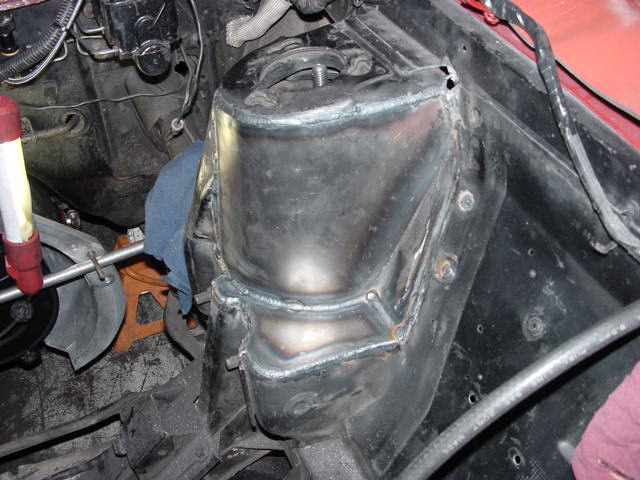
I've done a couple mods to the car since the last update. First, I built a new water reservoir for the W2A intercooler since the old one was looking a little rough, and was fading to pink to boot. The new reservoir is 8 gallons and constructed of aluminum, with a B&M Supercooler inside to keep the transmission cold. Thanks to a tip from a fellow TurboMustangs.com member Pooch (Jason), I found a large 8" diameter screw on lid for the tank to make it much easier to add ice to the tank quickly. Click on the thumbnail pics for a larger view.

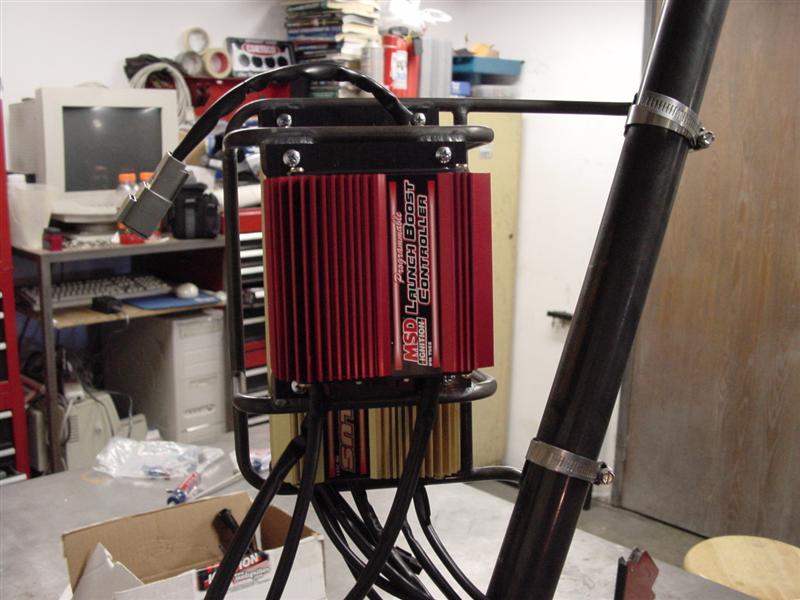
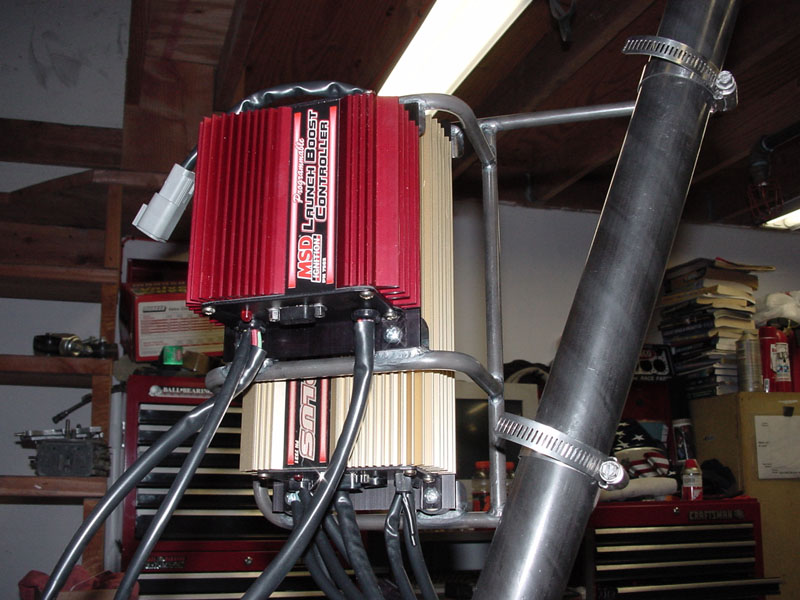
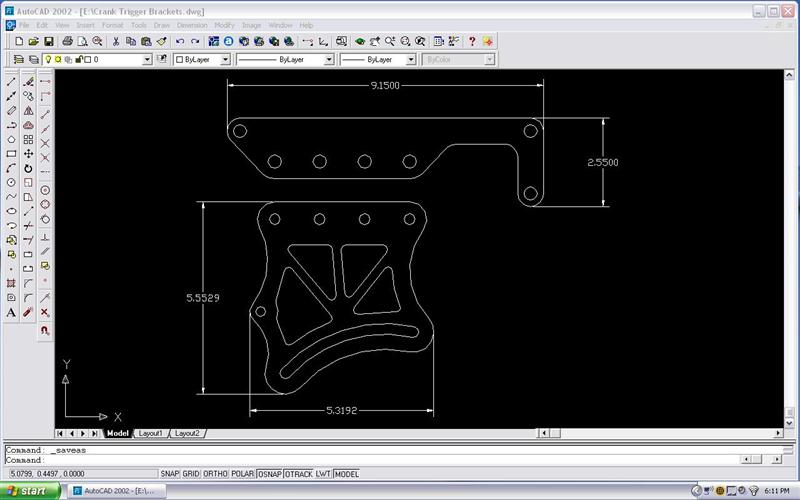
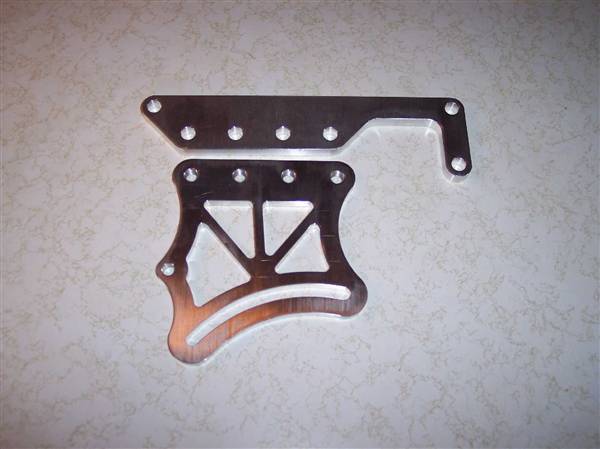
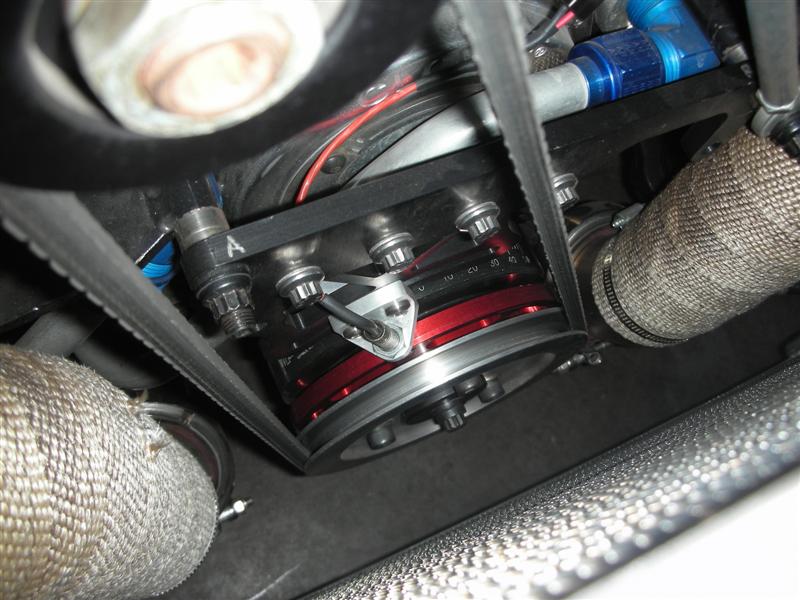
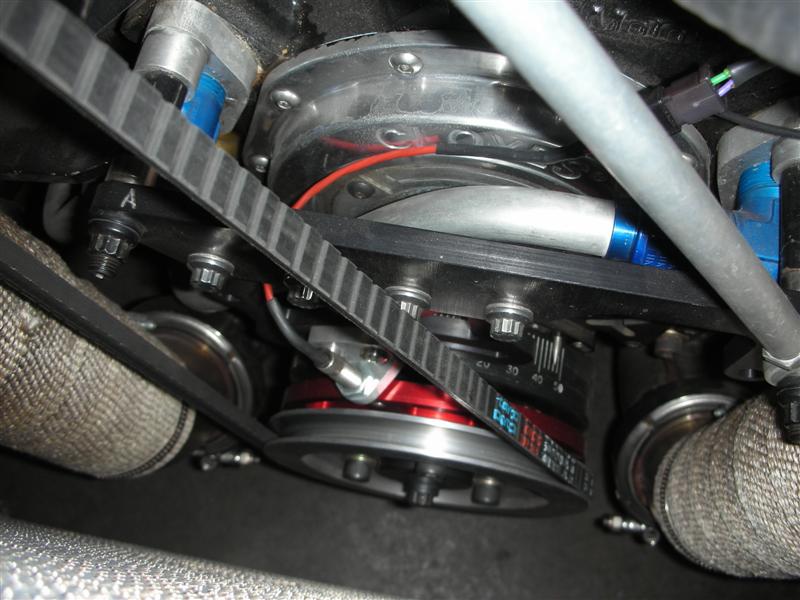
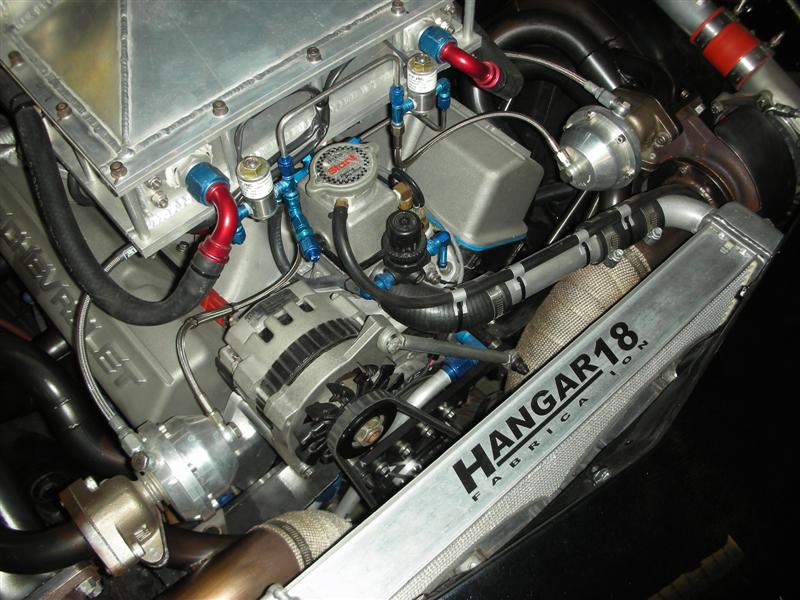
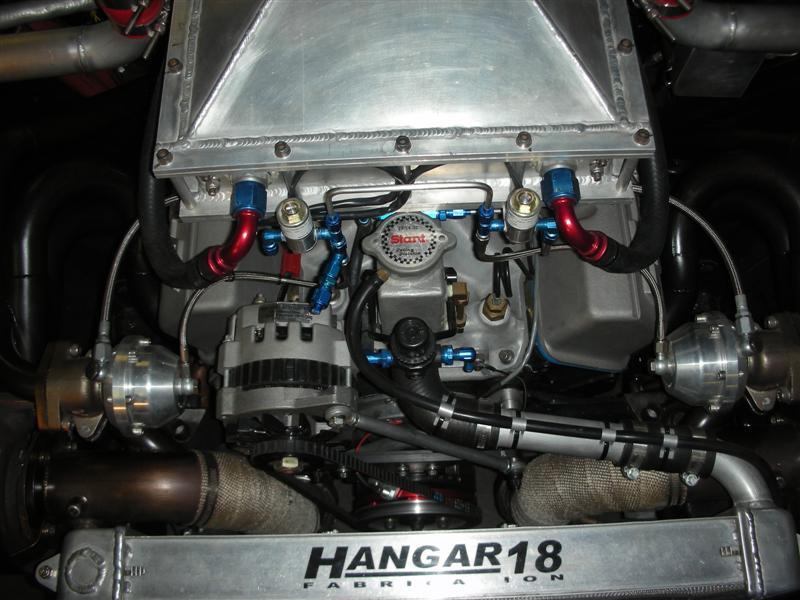
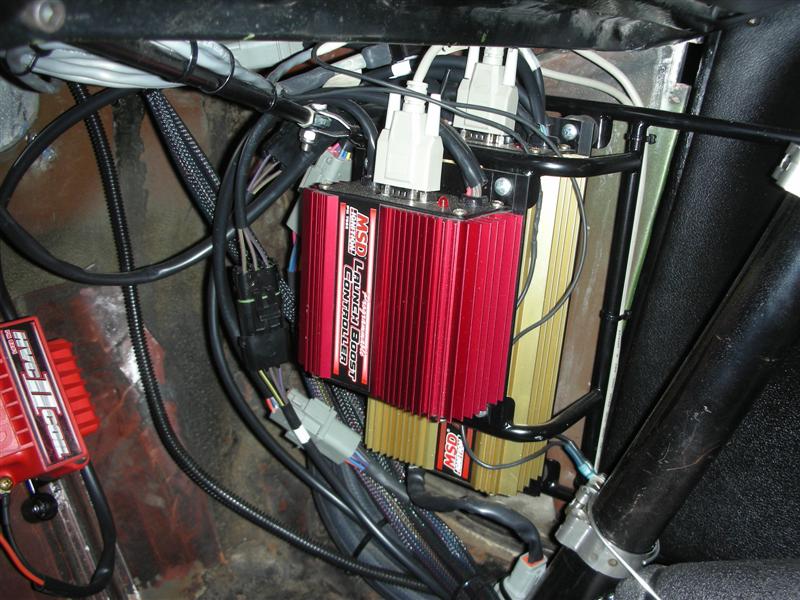
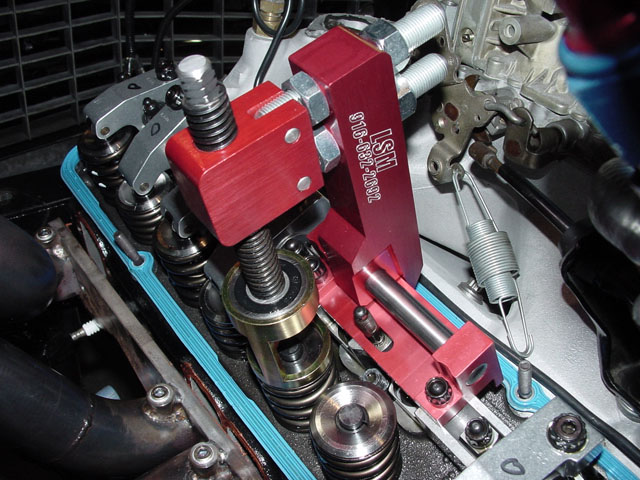
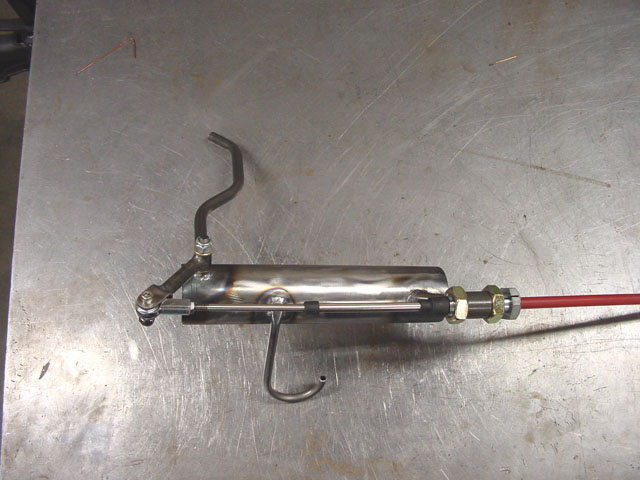
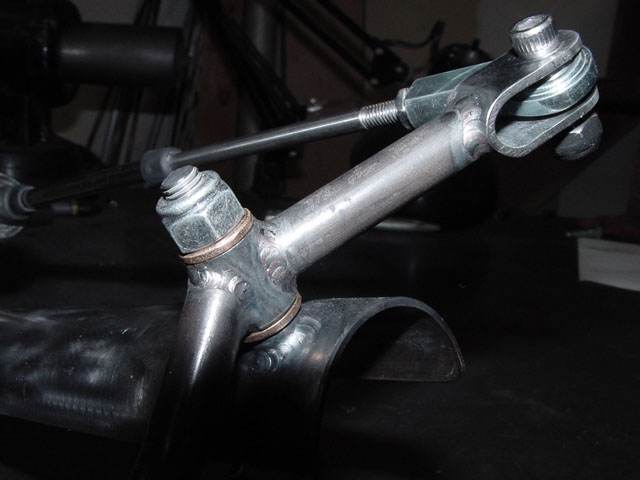
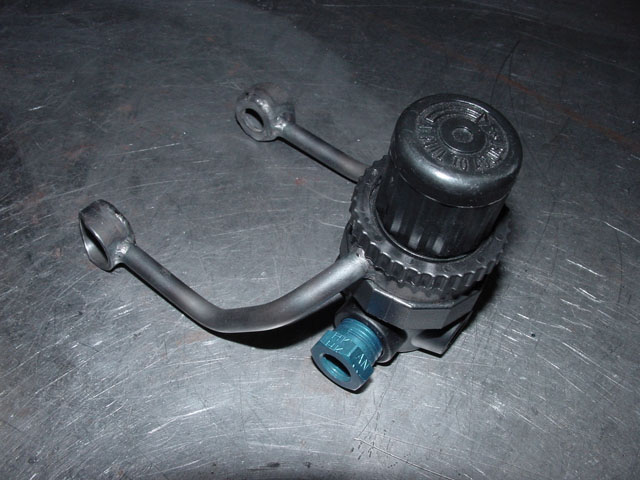
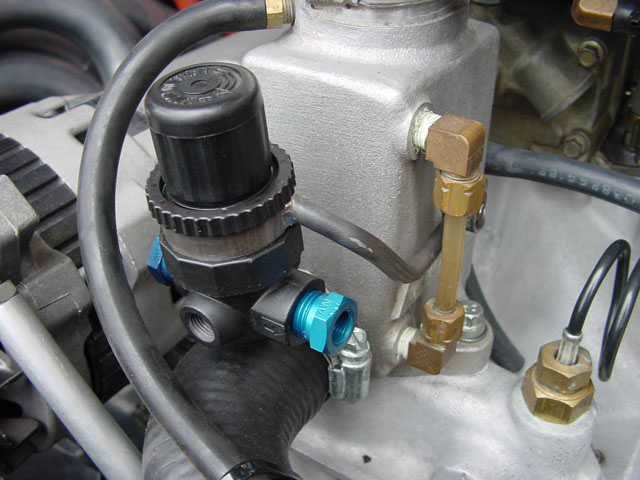
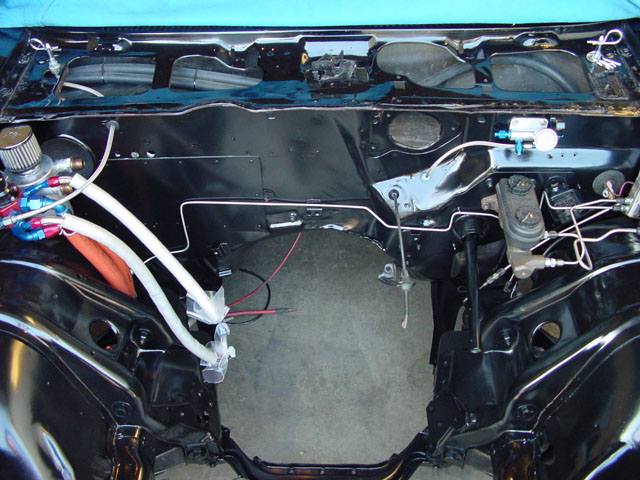
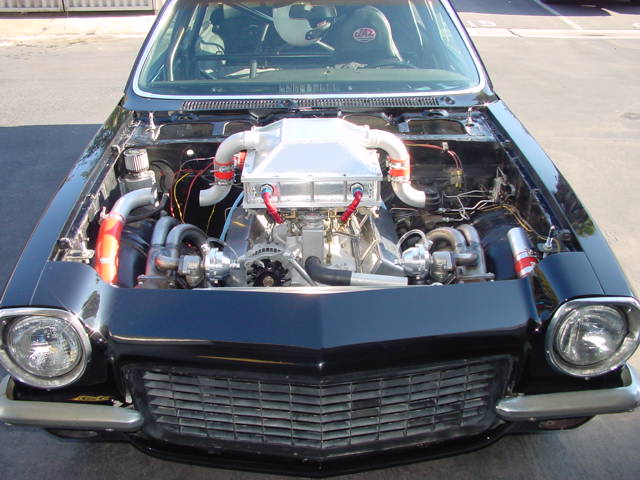
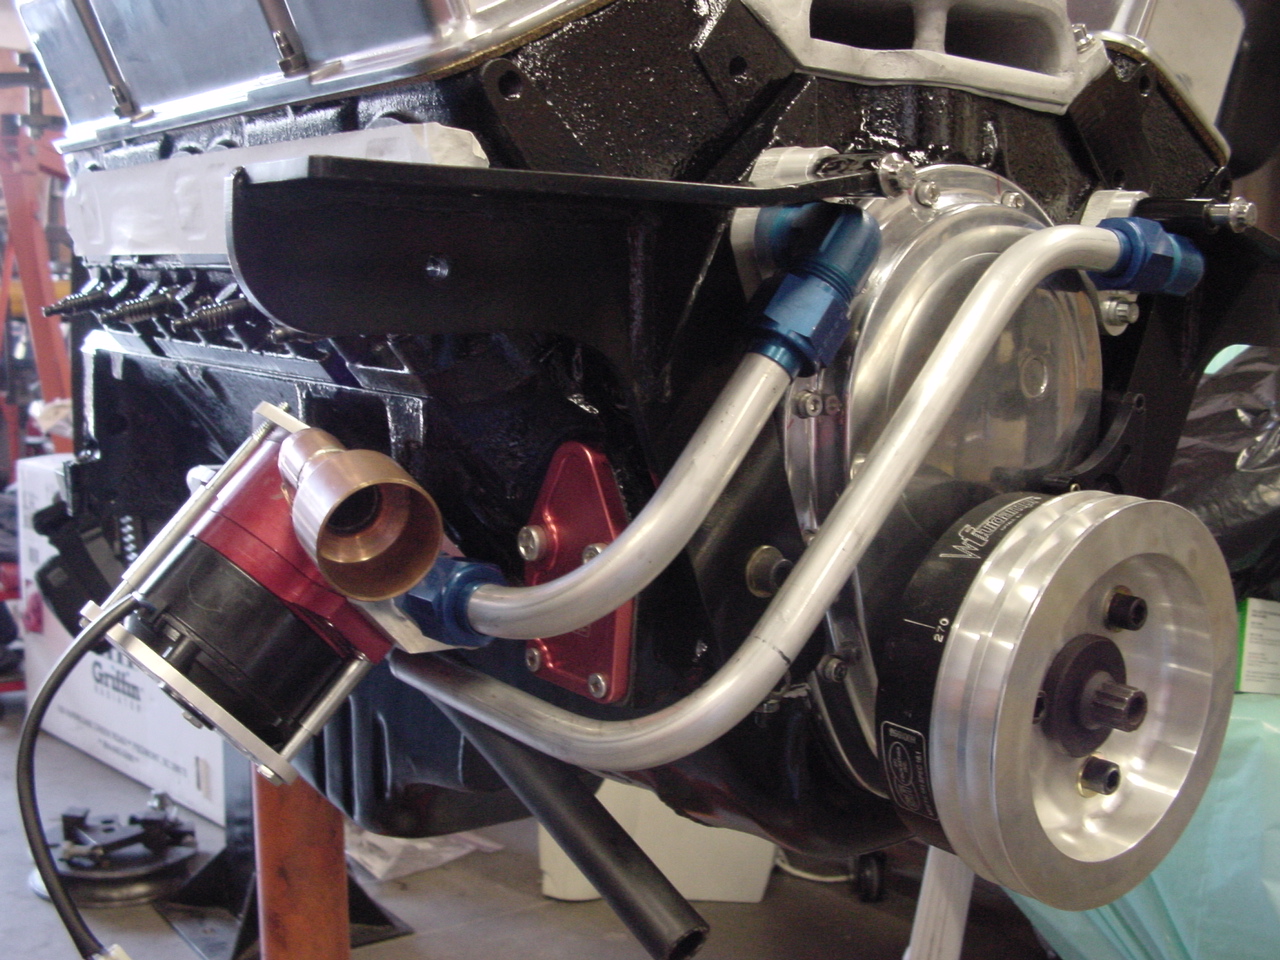
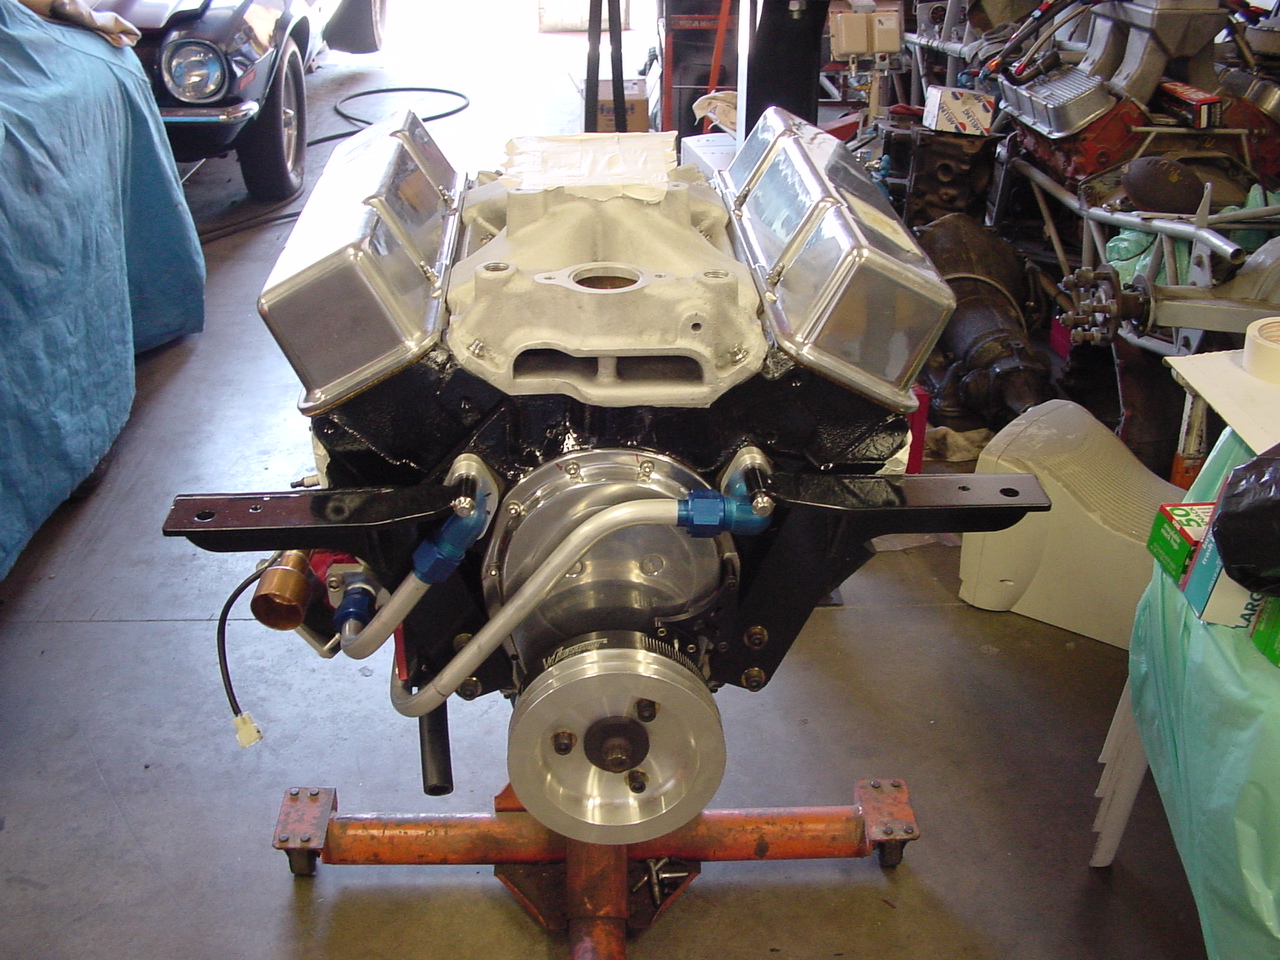
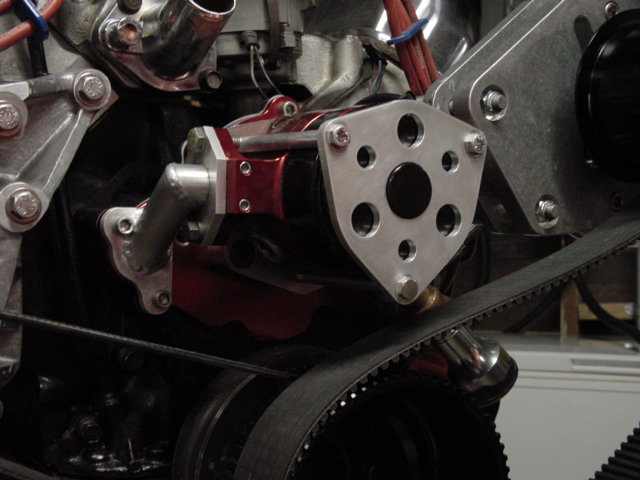
I also added a MSD 7562 boost controller, replumbed the wastegate signal hoses, and swapped out the old MSD 6AL ignition with a MSD Digital 7 Programmable Plus 7531 and an HVCII coil. In order to use all the functions of the 7531, I've added a custom fabricated crank trigger and modified the old MSD distributor to output a camshaft position signal. Here you can see some pics of the ignition/boost controller mount that clamps to front down bar on the rollcage, as well as the new wastegate plumbing and solenoid valves:

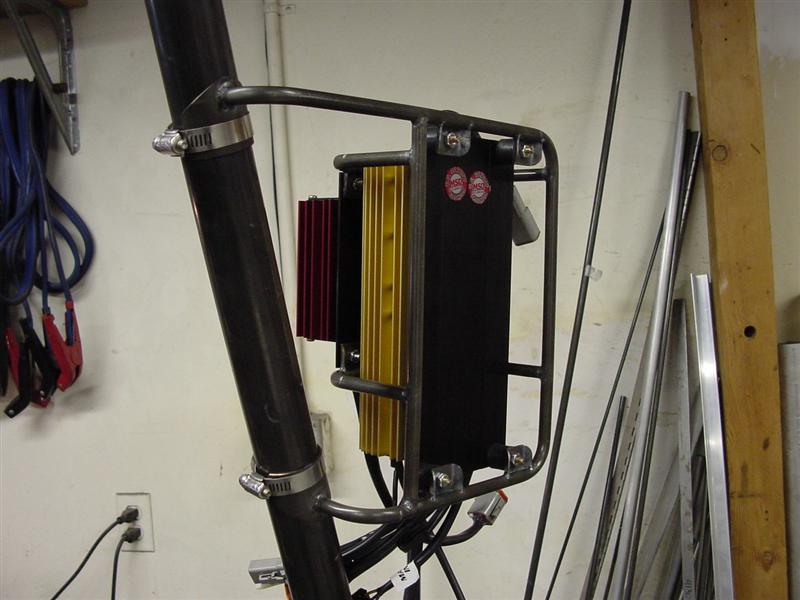
Here is a pic of the CAD drawing of the custom crank trigger mount I designed, and a pic of the parts that I had machined by another TurboMustangs.com member, mrtbolt64 (Chad). See the pics below for details.
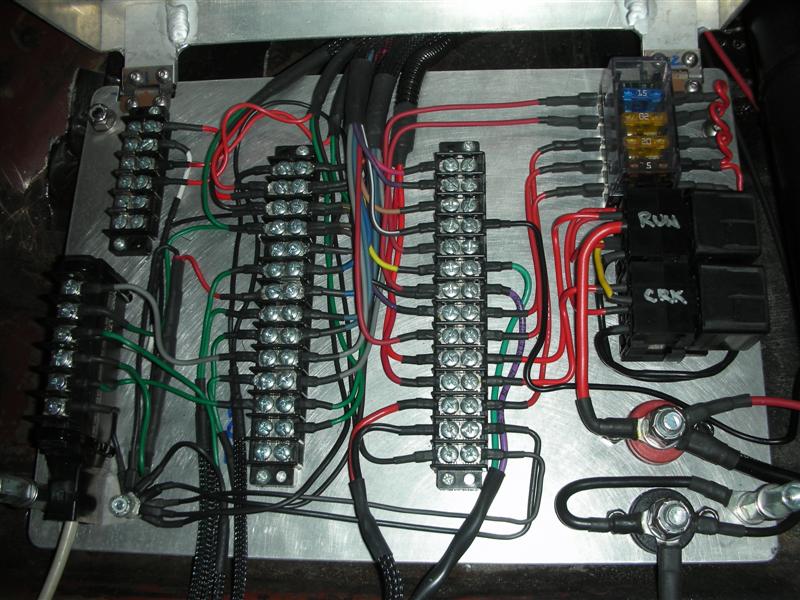
In addition, I rewired all the ignition, boost controller, and datalogger wiring. While I was at it, I also added a couple channels to the Innovate Motorsports LM-1 datalogger. With the MSD and LM-1, I can now datalog RPM, wideband O2, MAP, transbrake status, fuel pressure, oil pressure, exhaust pressure, ignition timing in each cylinder, four separate rev limits, gear changes, shift light status, RPM/Time/Pressure switch status, wastegate solenoid PWM values, current barometric pressure, and a number of other things.
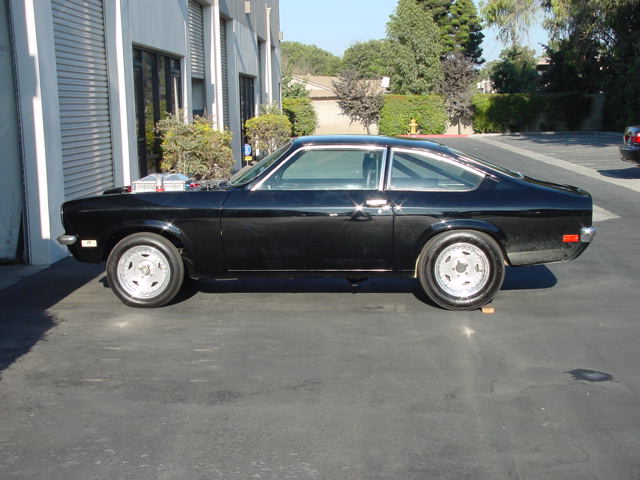
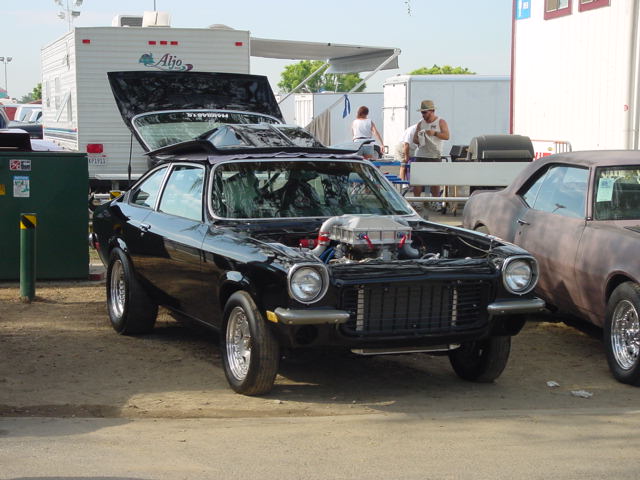
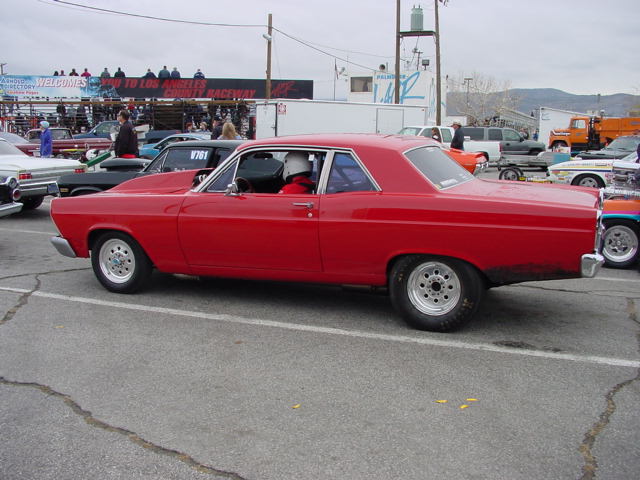
I also made it to the track a couple times since the last update. We rented Irwindale Dragstrip in November of '05 for some 1/8th mile testing. I was hoping to turn the boost up with my manual controller, but after a couple baseline runs the track surface went away and the car wouldn't hook. The best run that day was a 6.04 @ 121.04. I have some high quality videos from this outing, but they need to be rendered from DVD format. Because of all the upgrades and the time it took to rewire the car, I didn't make it back to the track until the following November in '06. This was another track rental at Irwindale's 1/8th mile track. I made a couple baseline runs, and decided to turn the boost up with the MSD controller. I datalogged the original boost curve with no controller hooked up, and added 3 psi across the curve. This curve launches with 9-10 psi, and slowly ramps up the boost to 17 psi at the end of the 1/8th mile to keep the car hooked. This resulted in a best ever 5.85 @ 121.98. Not too bad for a slow, linear boost curve! What was even more impressive was that the car netted a 1.38 60-foot time on the little 26x8.5 slicks and carried the tire for 20-30 feet! I tried to leave with more boost, but the track went away, and every other pass spun hard right out of the gate, even with the boost controller turned off. The only good video I got was when the car blew the tires off.
Right click, Save As: http://www.swtracing.com/videos/badwheelspin.wmv
06.28.05
SWT Racing has a new team member! Zara Belle was born May 17th weighing in at 7 lbs 7oz. I better get to work on the blowthough carbureted/turbocharged Jr. Dragster. ;)

04.14.05 - New Video
The engine is back together after the lash cap incident and running well. I went to the Thursday night test and tune for some more 1/8th mile runs. I only managed to get two runs in. The first was a 6.14 and the second was a 6.04. To see the 6.14 pass, please right click the following link and "Save Target As": 6.04 @ 120.8
03.12.05
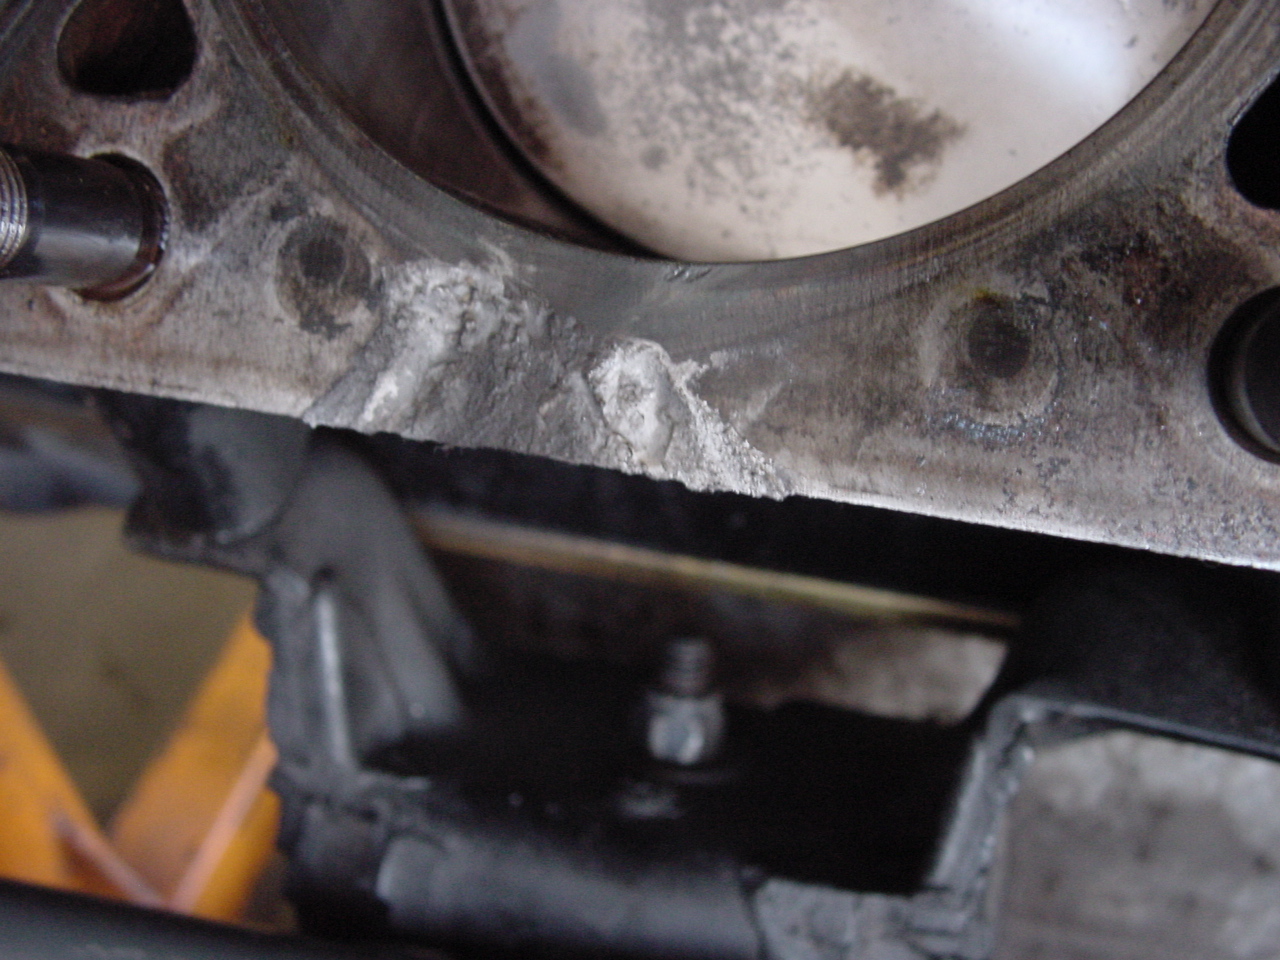
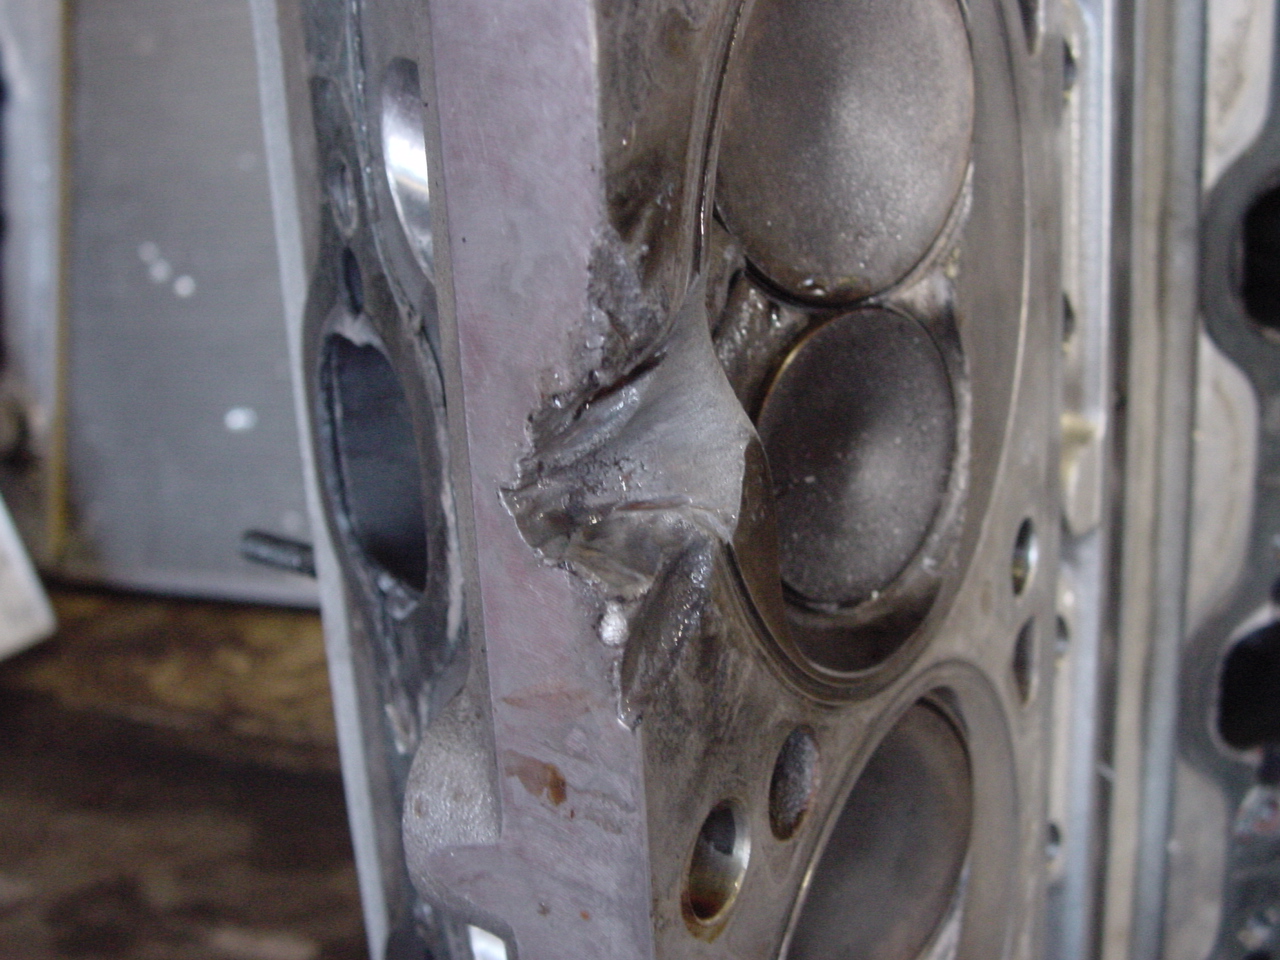
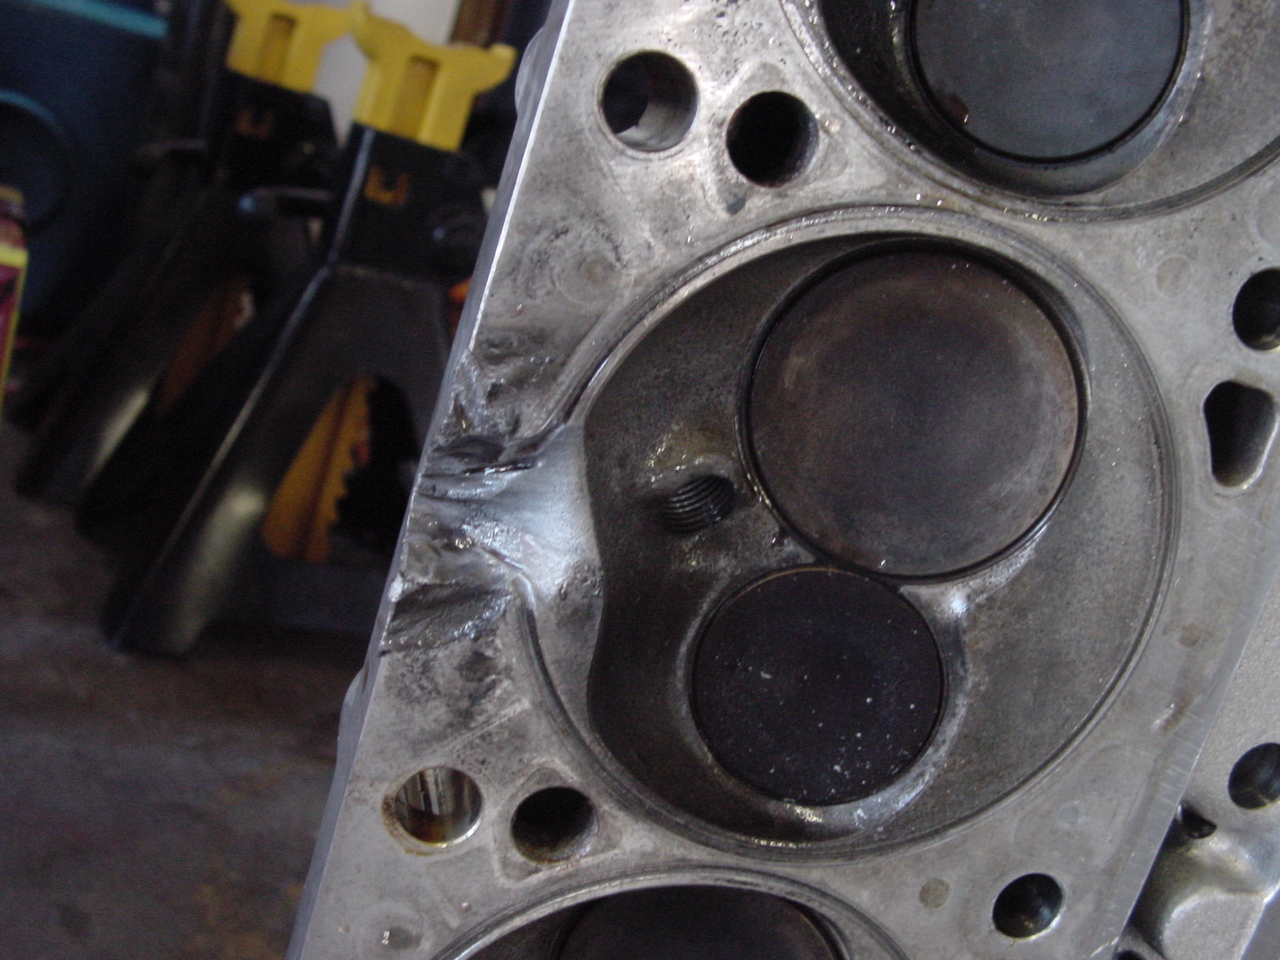
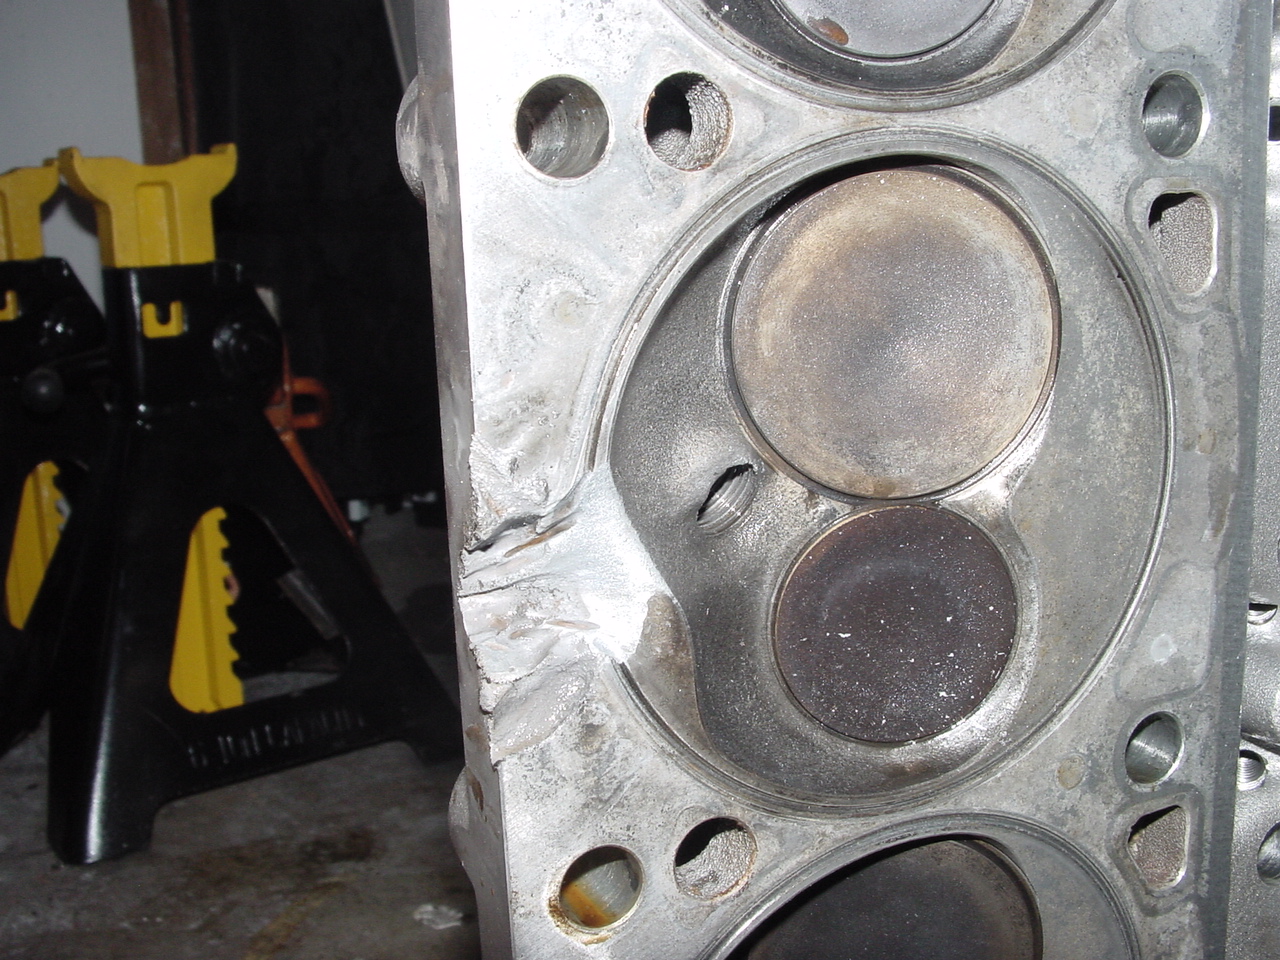
I finally got around to digging into the engine a bit to figure out why the lash cap came off. Upon closer inspection, the exhaust valve that the cap came off of was seized. I took the heads off and took them back to QMP Racing Engines to have then checked out. The owner, Brad Lagman, checked it out while I waited. Apparently, there was a tiny pinhole through the water jacket underneath one of the pressed in valve guides. Water finally made it's way out from behind the guide and got up into the guide and stuck the exhaust valve. Brad disassembled both heads, rechecked all the valves and guide clearances, got the problem guide/valve cleared up with new pieces and sent me on my way in a couple hours.
02.27.05
Went to the track again for some more 1/8th mile action. I was able to make three runs.
First pass:
60': 1.493
330": 4.063
1/8: 6.136
MPH: 119.53
Second pass:
60': 1.456
330": 3.999
1/8: 6.050
MPH: 120.51
Third pass:
60": 1.486
330": 4.042
1/8: 6.105
MPH: 118.32
After the third pass, the engine was making a loud ticking noise. I pulled off
the valve covers and discovered that a lash cap on the #5 exhaust had come off.
I have no idea how it could have come off. I pulled the shaft mount assembly off
and reinstalled the lash cap and bolted the rockers back down. Valve lash was
normal, and I doubt it floated a valve, considering I have 230# on the seat
and a rev-kit. I'll have to look into that further. Special thanks go out to
Chris and Jay for helping out at the track!
The new engine is starting to show it's true potential. All three runs were leaving at around 8 psi boost, with 14 psi total going down track. I'm still running the 3.25 gears as well. I may switch back to a 3.50 gear, but I want to make a few runs on a 1/4 mile track before making any changes.
I got a couple more videos this time as well. To view, please right click and "Save Target As": 6.13 @ 119.5 and 6.05 @ 120.5
02.10.05
After getting the rear brake situation fixed on the car, I got the chance to take the Vega out to Irwindale again. The first pass it went 6.309 @ 117 leaving on only 5 pounds of boost. I was ready to make another run, but it started to rain, ending our trip prematurely. Someday the Vega will be able to run more than one pass per trip!
At least I was able to get some video this time. To view, please right click and "Save Target As": 6.30 @ 117
02.08.05
A couple new updates. . .
I was not able to make out yearly trip to LACR for the annual Hangover Nationals. After thrashing on the car for months to get the new engine done, the master cylinder failed three days before the event. I bought a Strange Engineering master cylinder and had it shipped UPS Next Day Air to replace the old one, but it uses different fittings than a standard Mopar-type master. I found some fittings at the local parts store, but of course they were machined improperly. The store located some new ones and had them delivered the next day, but they were even worse than the first set. I think someone is trying to tell me something. . .
I ordered the proper Aeroquip fittings from Summit and got them installed just after the New Year. With the brake situation handled, we took the Vega out to the local 1/8th mile track at Irwindale Speedway on January 13th. Unfortunately things did not go as planned. We kept hearing an intermittent noise in the rear while I was driving up the staging lanes, but we could not pinpoint the noise. After a quick investigation, we could not find the problem and the noise mysteriously disappeared. With the noise seemingly gone, I went ahead with a shakedown run on the new engine. Everything seemed fine until I let out of the throttle just before the 330' markers. . .then came the hellacious noise! I couldn't tell if I had a rod knock, broke a driveshaft or killed a gear in the trans. After a quick investigation in the pits we discovered the problem.
If you recall, I installed an Aerospace Components rear disk brake kit on the car back in March. Apparently, somebody (me) just mocked up the assembly and forgot to loctite and torque the bolts that hold the rotor to the hat. The allen bolts that hold the rotor on the hat were backing out and hitting the bracket that holds the caliper to the rearend housing. Oops!

12.15.04
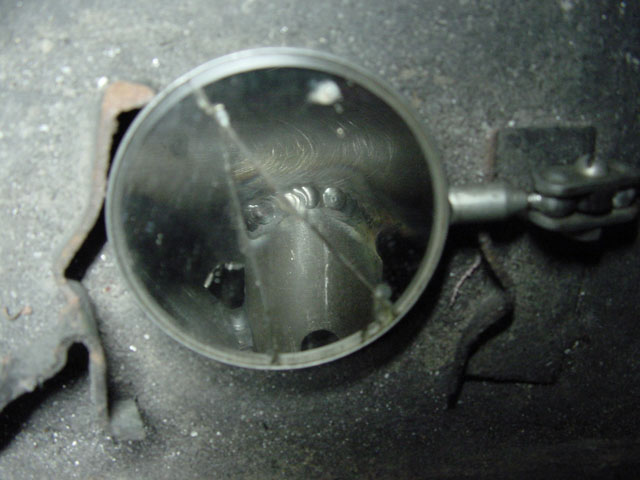
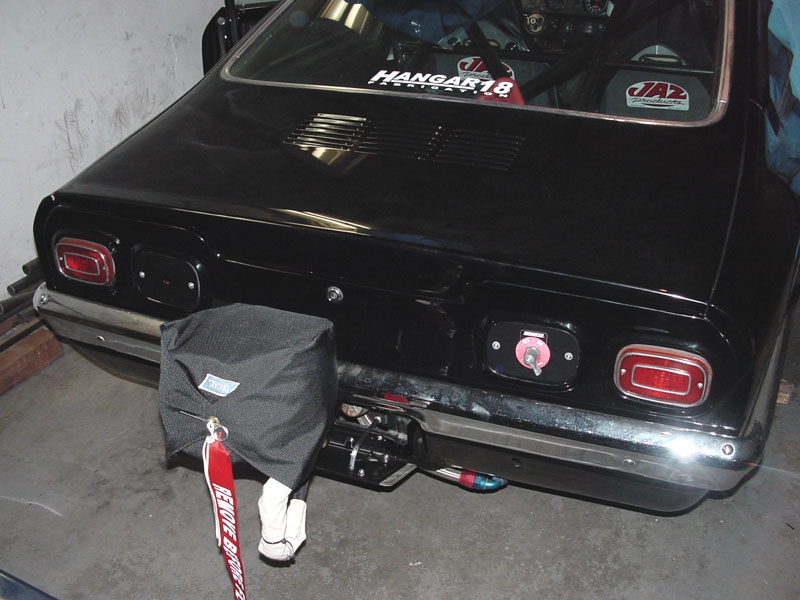
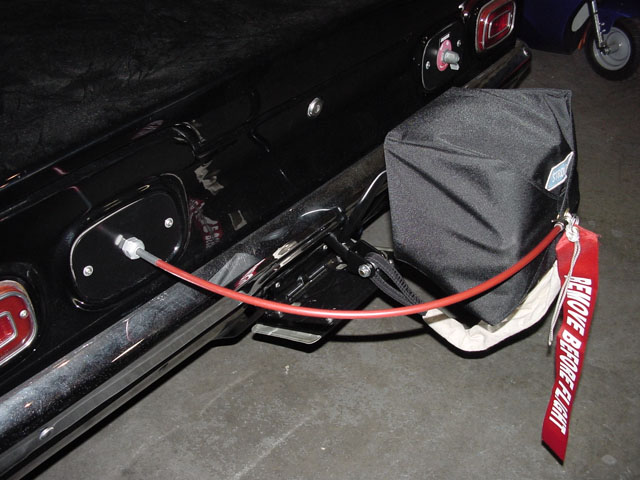
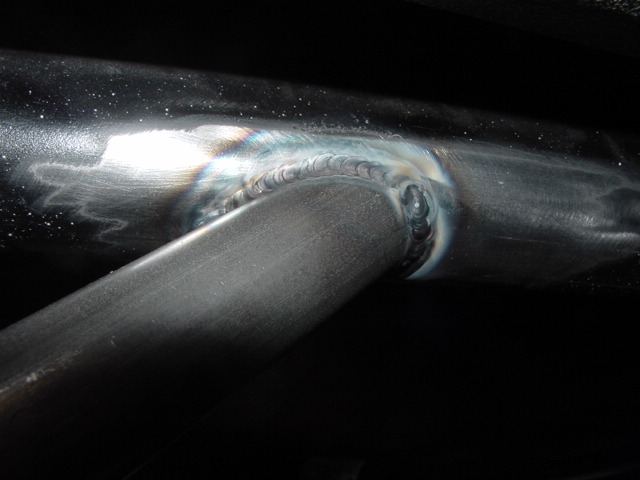
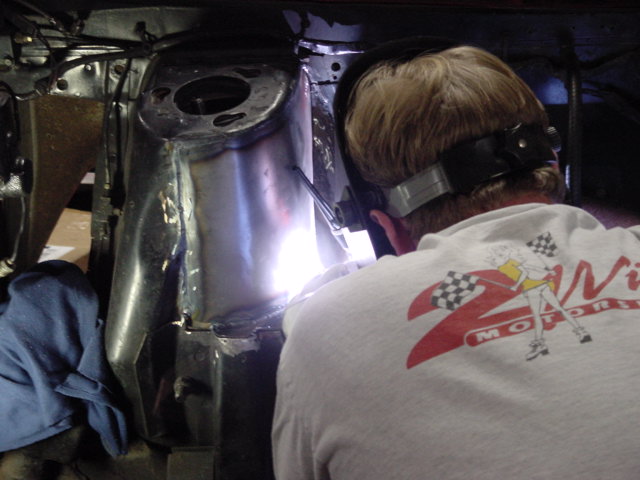
I finally got the parachute mount done on the car. This was one of the projects that I was dreading because of the upside down welding that would have to be done. Because the rear crossmember of the cage is right at bumper level, I had to sneak the anchor for the 'chute underneath and through the floor. I had to cut a hole in the sheetmetal behind the fold down license plate between the bumper and the filler neck for the stock fuel tank. This wan not a big deal, but once I cut the hole, the real challenge was welding the anchor to the crossmember, along with some lateral support. There's not a lot of room in there so most of it was welded on the bench. The rest was welded in the car, with the aid of a small mechanic's inspection mirror.
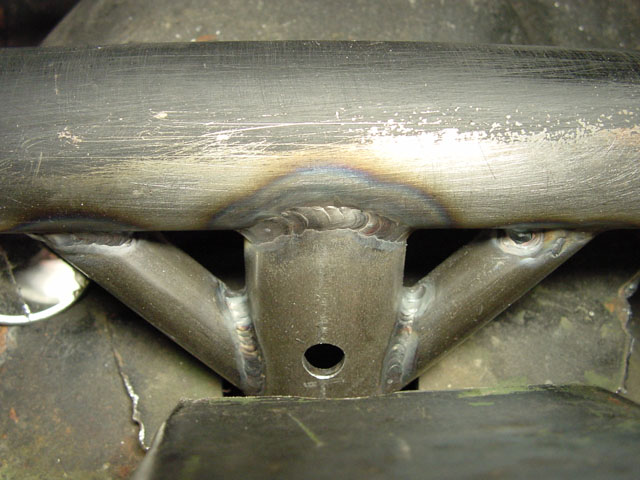
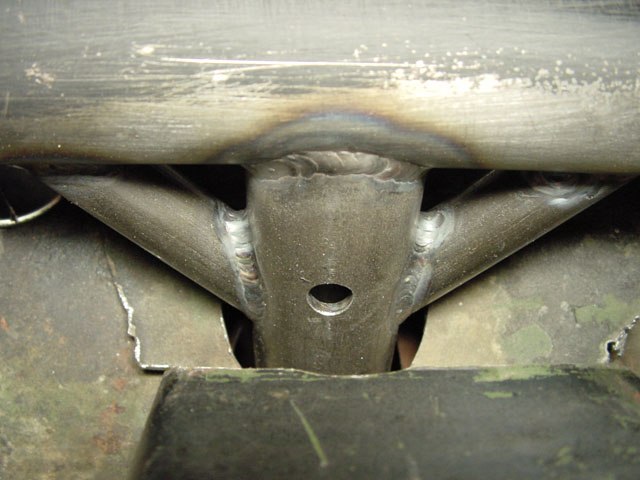
Here are a few pics of the pack mount and the small tube used to hold the license plate down:
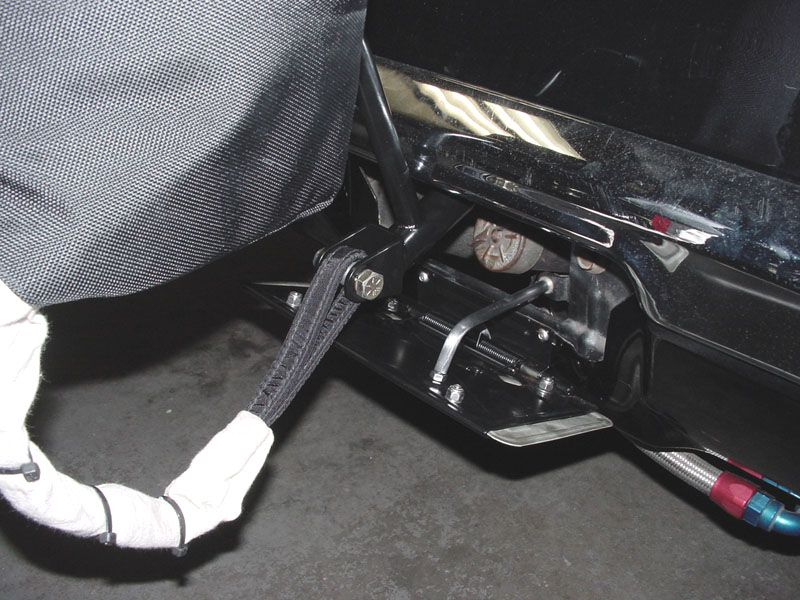

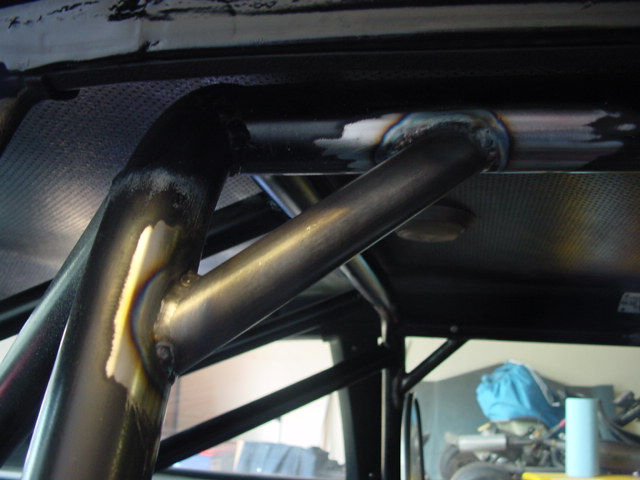
This is the 'chute release lever. I made it from 3/8" x .039 4130 CrMo tube. The pivot and cable anchor are welded on a saddle mount that can clamp to the rollcage and be moved as desired. I also incorporated a small hook made from 1/4" x .039 CrMo to hold the removable steering wheel.

While I was at it, I also made a small mount for my manual boost controller:
11.25.04
Happy Thanksgiving!
Since working at the shop is out of the question after indulging in so much turkey, I thought a site update was in order. The Vega runs once more! There are still a number of things to finish up before the car is race ready, but it's getting there. Since I had all the brake lines out of the car when I painted the engine compartment, along with installing the new rear disc brake setup, I'm still trying to get the last bit of air out of the system. I also need to build a parachute mount and release system for the car, along with some painting inside the car where I redid dome of the floor and 'cage around the ladder bars. I'd also like to modify my window net mount, since I've never been very happy with it. I hope to get a lot of this done this weekend, along with a torque converter stall test on the transbrake. For now, I'll just post a bunch of pics and some commentary from building the engine.
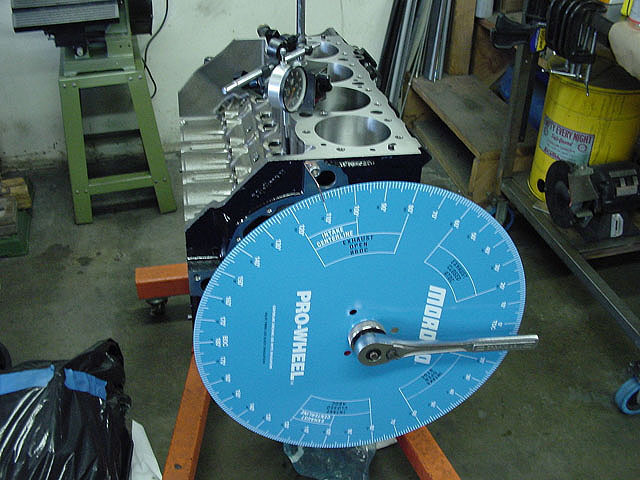
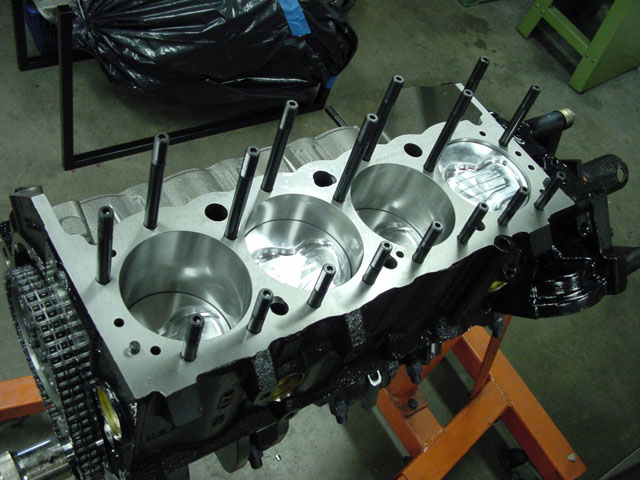
The short block build went relatively smooth, since I had already checked and set the clearances months earlier when the crank first came back from the machine shop. The mains were set at .003", the rods at .0025" and the gaps on the top and second rings were filed to .026". The piston skirt clearance was set at .006". I also degreed the cam and installed it on a 110° intake centerline.

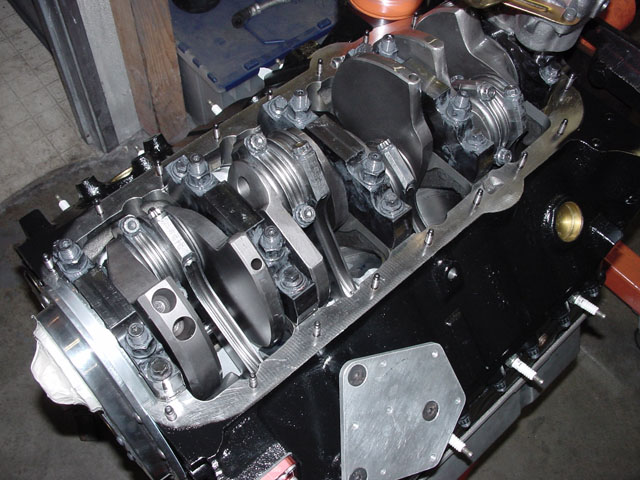

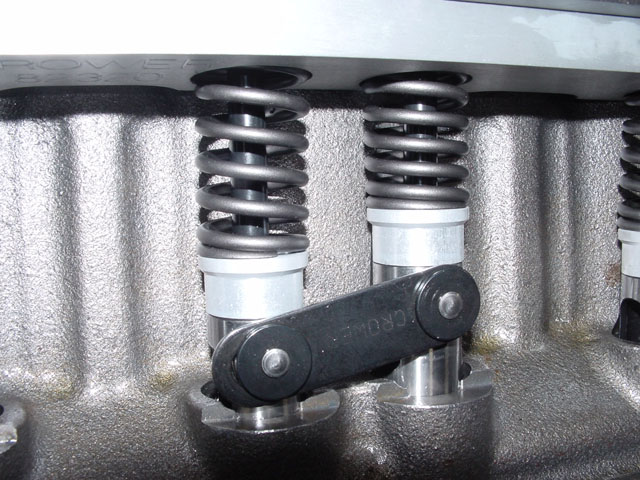
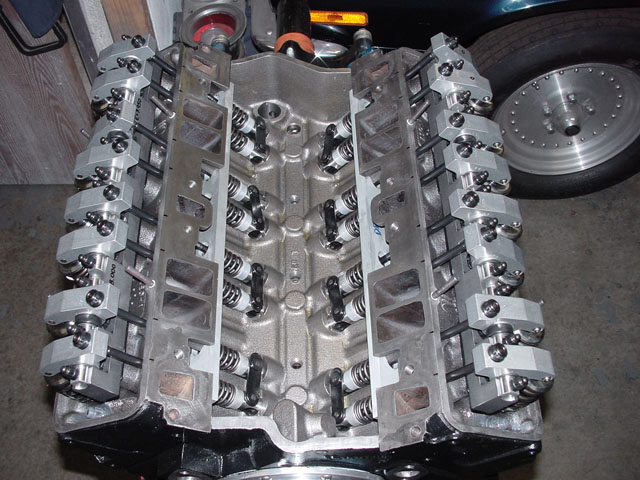
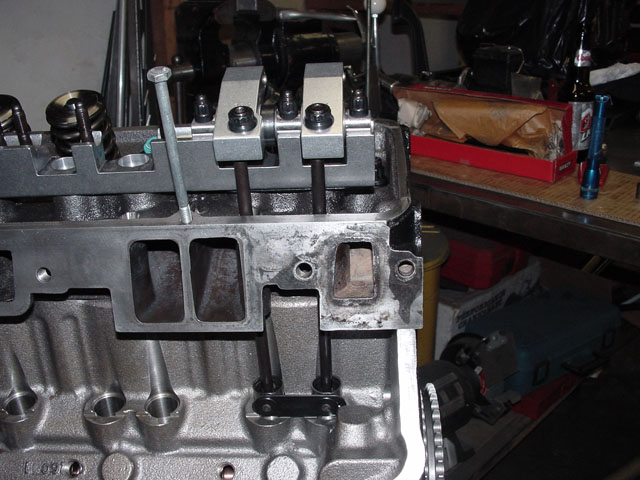
The valvetrain on the other hand, was a PITA. It was one problem after another. You'll note that earlier in the build, I mentioned I had to go with a T&D shaft mounted rocker system to clear the valvesprings. I discovered during the preliminary mock up that the geometry was way off with the stands T&D sent with the rockers. A call to T&D Machine sorted things out and they got me on my way with a set of +.200" rocker stands. Because of the nature of a shaft mounted rocker, the taller stands moves the rocker fulcrum up and back. This solved my rocker to valve tip geometry problem, but created a couple new issues. Because the rocker was now moved toward the intake, my old valve covers would not fit. I had to go with the Nascar/18° covers with an internal rail on the intake side. The other issue was that now the pushrods were hitting the head because of the new geometry. So. . .I had to completely disassemble the heads and throw them up on the mill to clearance the pushrod holes for clearance. Problems solved? Well, sort of. Now, the valvetrain was all set up and the proper pushrod lengths were determined. However, because the rockers were moved, the pushrods were very close to the valve cover rail. So close in fact, that I had to mill slots in the valve cover rails and use special Brodix -12/18° valve cover gaskets so that the pushrods would clear.
I thought that I had everything covered at this point. That is, until I went to install the Crower rev-kit. I was having a hell of a time getting the springs installed. It took two hours to get one spring in, and that was with a special spring compressor that I bent in the process. The next day, I called up Crower and got the dimensions for the rev-kit springs. Apparently, they put the wrong springs in the box. They happily exchanged them, even though I had bought it from a dealer about 9 months earlier. With the new springs in hand, the rev-kit went on without a hitch.
While I'm at it, I'd like to thank Jason and Brett at Aeromotive. It seems they had a motor upgrade on their A1000 fuel pumps since I bought mine. The newer versions flow a little more, so I contacted them about upgrading mine. I sent mine in, and they had it upgraded and flow tested in a few days. . .and they did it at no charge! Thumbs up to the guys at Aeromotive!
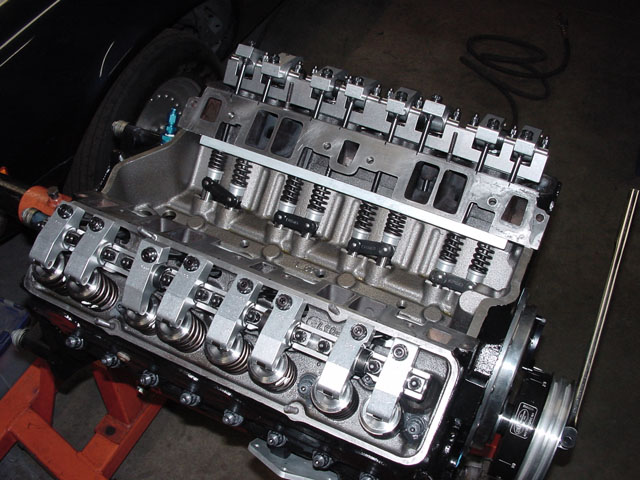
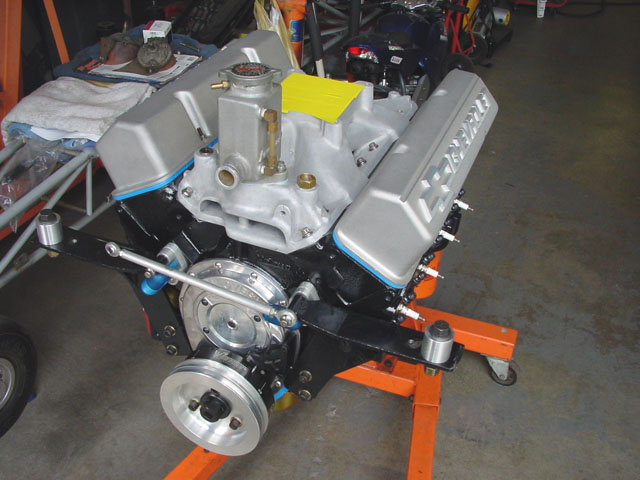
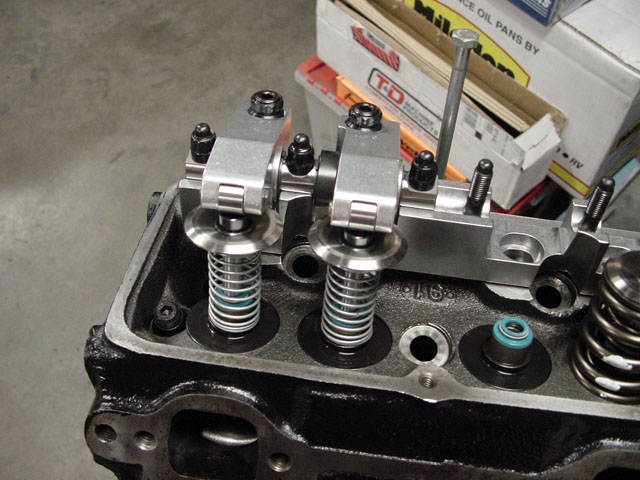
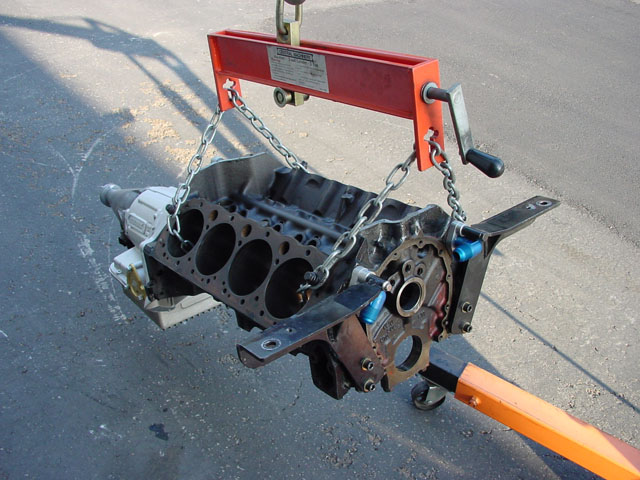
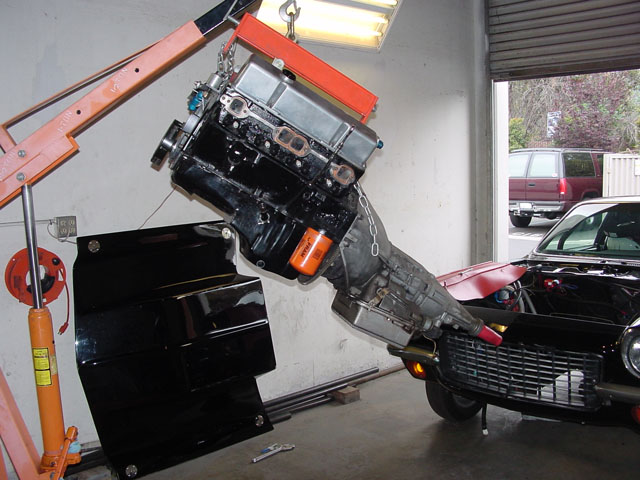
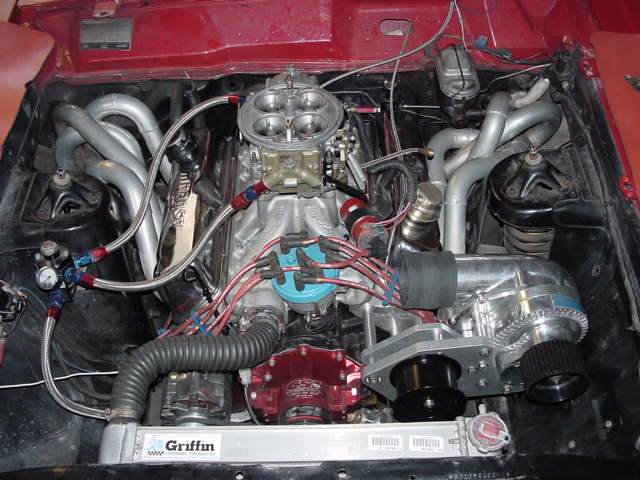
Well, here's a pic of the engine as it sits right now. Besides the valve covers and new engine compartment paint, it looks just like it did before. . .but now it's ready to see some more serious boost!
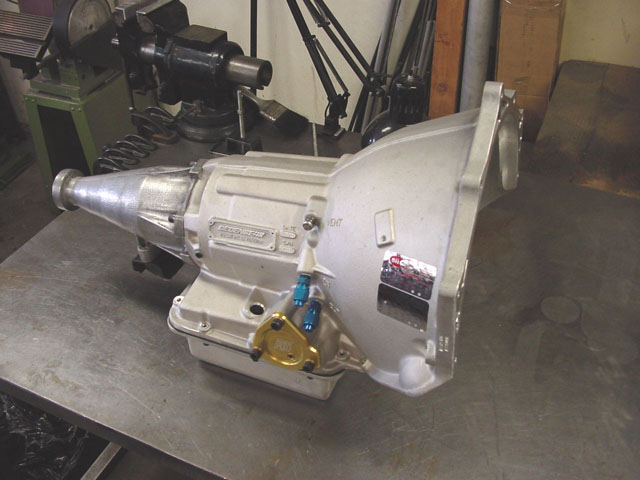
09.28.04
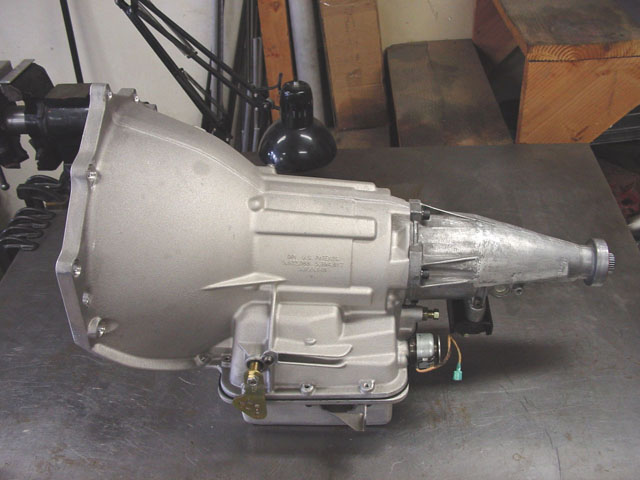
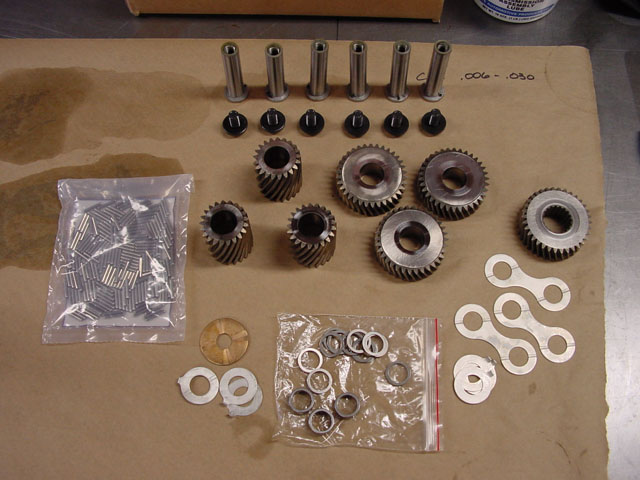
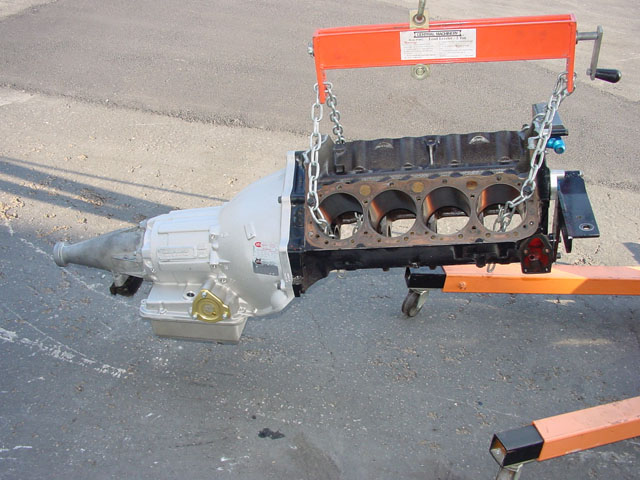
Finally got a chance to assemble the newly upgraded Powerglide transmission. It was working fine when it was removed along with the engine. . .although I can't say the same for the engine. :) I went with a Dedenbear case for this build because of the compact nature of the Vega's transmission tunnel. Standard SFI shields for the flexplate and planetary were out of the question. I am also quite fond of my legs and feet, so it was really my only choice. I ended up reusing all the steels and clutches, but upgraded a number of items while it was apart. I added a new 4130 stator support, a lightened 4130 high gear clutch hub, added a roller governor support to go along with the roller bearing in the Dedenbear case, and a dual Teflon ring servo piston. I also machined the pump for a roller thrust bearing, removed every other spring in the high gear piston to speed high gear apply, added HD springs to the reverse piston to speed transbrake release, and modified the lubrication circuits for increased longevity.
I also traded my old 8" converter that was slipping about 16% in high gear for a dedicated 9" turbo converter with a steel stator. This is Continental Converters top of the line unit. Hopefully it will be close enough for my combo to only need a little tweaking.
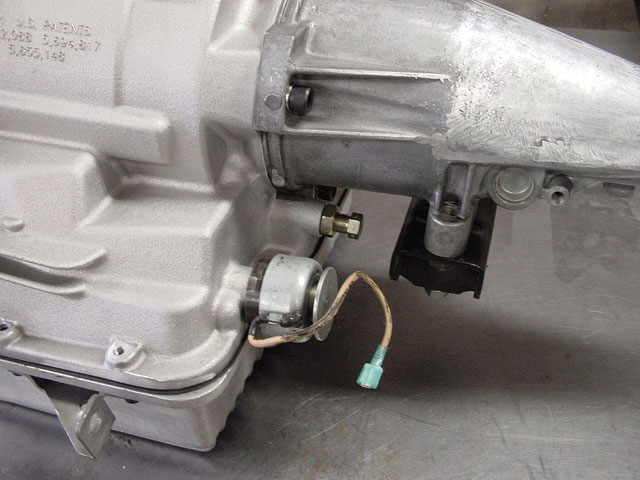
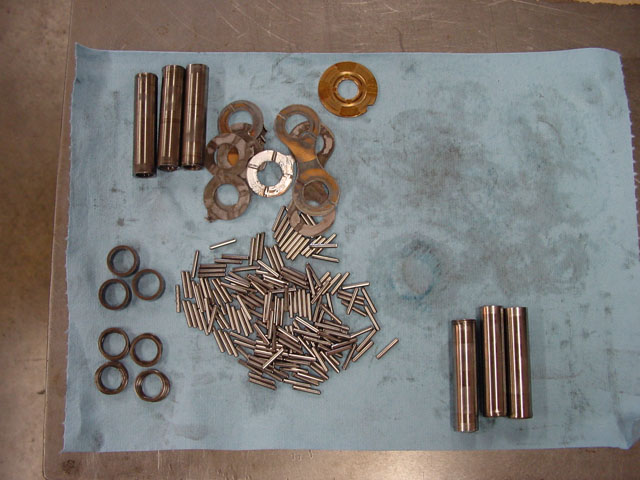
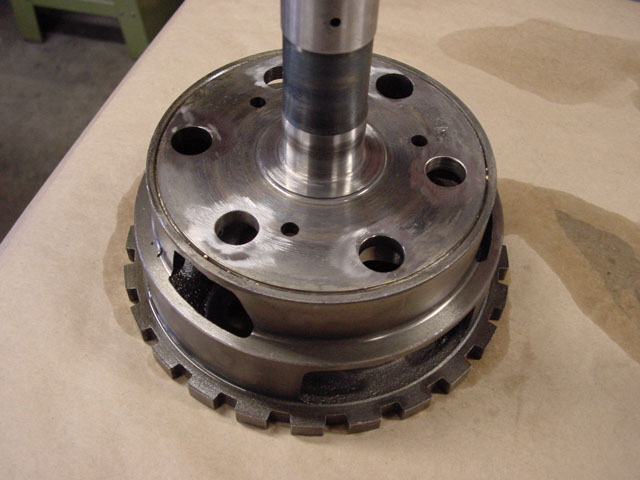
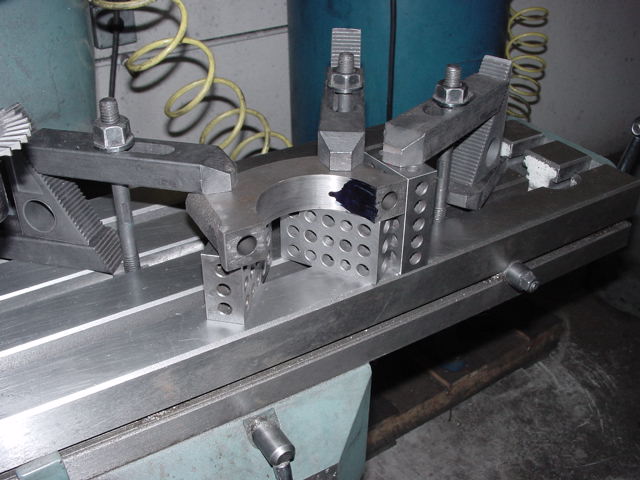
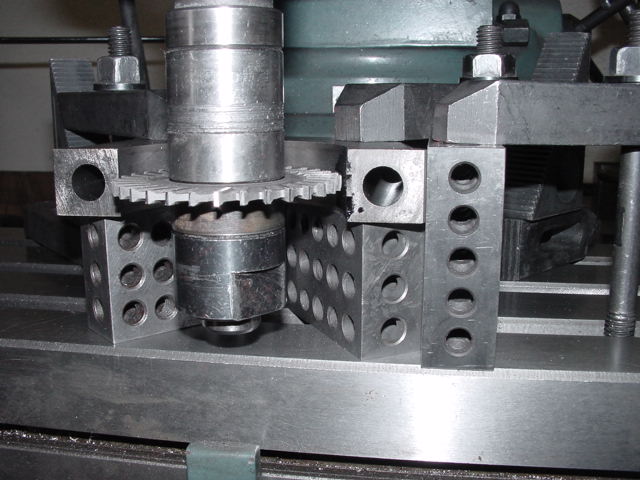
When I was rebuilding the transmission I found I needed to replace the thrust washer inside the planetary. This would require taking the planetary apart. 1.76 Powerglide planetaries were never designed to be disassembled, so I had to grind the old pinion axles out and replace them with bolt in axles. Sonnax offers a complete rebuild kit with all new needle bearings (all 180 of them), new thrust washers and bolt-in axles. Unfortunately, when I reassembled the carrier I torqued the bolts for the axles too tight and yielded the carrier such that when the bolts were torqued in place with as little as 5 ft-lbs, the end clearance on the pinions was insufficient. I put a call in to Mike Stewart at Mike's Transmission in Lancaster, Ca who said this situation is not uncommon when rebuilding a planetary. Since I did not have the means of machining and rewelding the planetary back together properly, I decided to buy one of his Super Set planetaries with a 4340 output shaft and heat treated gears. Below are a few pics of the stock planetary setup as it was apart.
09.10.04
Things have been progressing rather slowly, so I decided to update the page with some of the things I've been dealing with during this engine upgrade. After disassembling the old shortblock a few months ago, I decided to go with a solid roller cam setup instead of the small hydraulic flat tappet I had been using. I contacted Cam Motion to have them spec out a nice solid roller for the Vega's new engine. The new cam specs out as follows:
Intake Duration @ .050": 248°
Exhaust Duration @ .050": 238°
Intake Lift w/1.6 rocker: .683"
Exhaust Lift w/1.6 rocker: .645"
Lobe Separation Angle: 114°
Intake Centerline: 110°
Check out the cam card, as well as a couple pics:
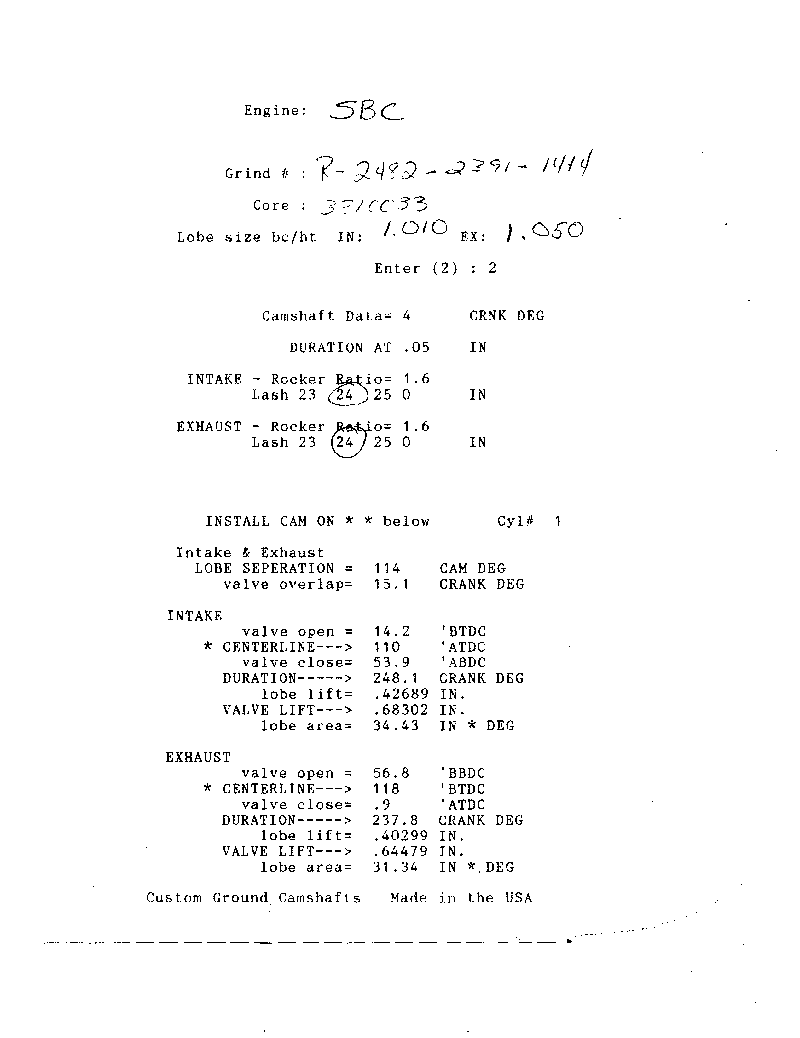
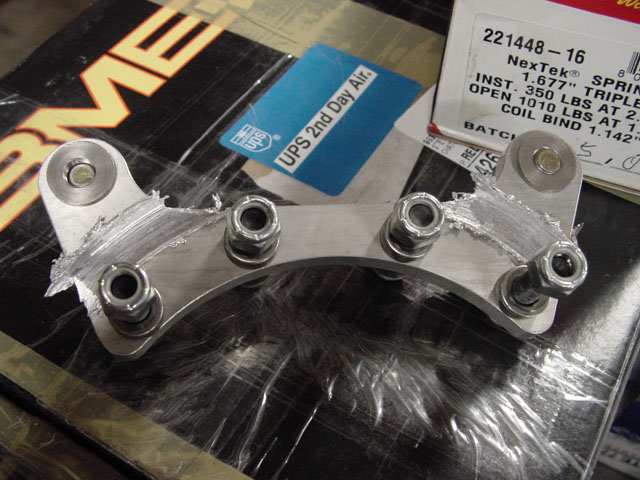
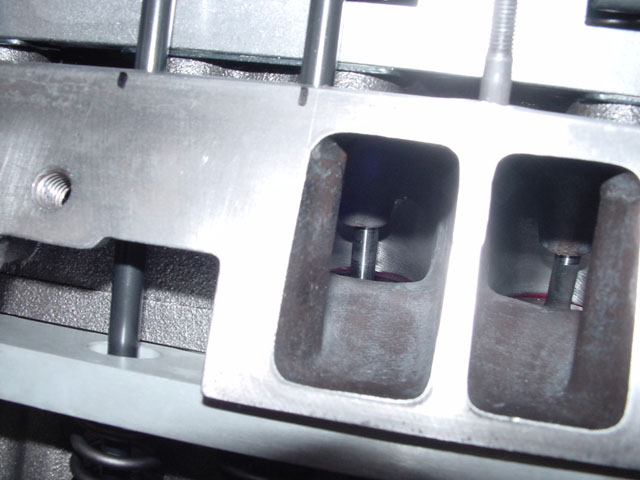
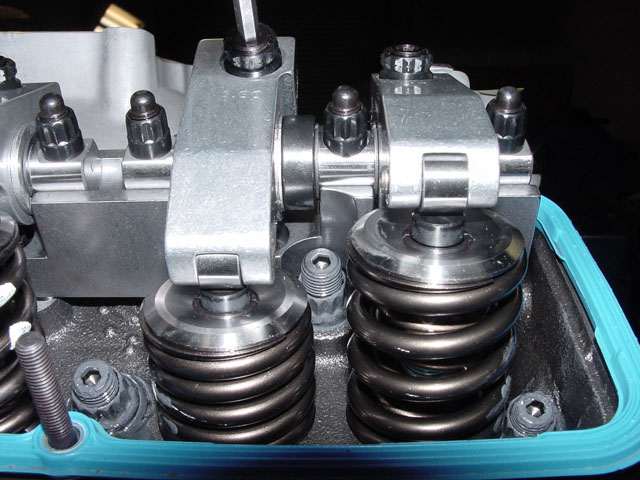
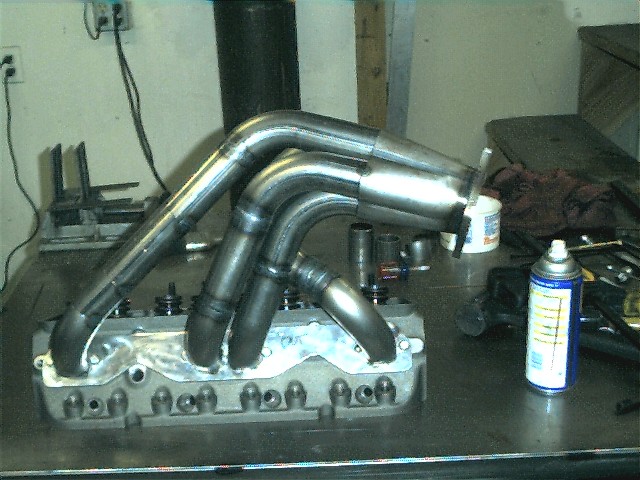
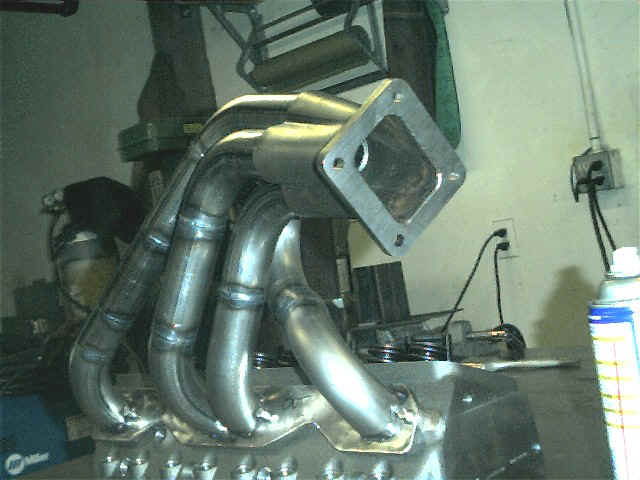
To go along with the new cam, I opted to run a Crower Rev-Kit as well as Crower roller lifters. I also had QMP Racing Engines do a little work to my cylinder heads while the engine was apart. I upgraded all the valves to 2.055/1.60 Manley Severe Duty units, along with new springs and retainers. I wanted a lot of life from my valve springs, so rather than use an H-11 or other tool steel spring, I went with Manley NexTek chrome silicon springs and matching titanium retainers. Because of the added boost pressure in the intake tract and exhaust backpressure present in the exhaust, I needed 250 pounds of spring force on the seat. Because the NexTek springs check in at a somewhat large 1.580" diameter, I've been having some problems finding rocker arms that would clear the spring. My old Isky rockers would not even slide onto the stud before hitting the spring. I purchased a set of Crane Gold Race rockers that are advertised to clear a 1.630" spring, but they barely fit. My only option at this point was to go to a set of shaft mounted rockers. So. . .I made a call to T&D Machine who set me up with a set of 1.6 ratio rockers with .170" offset intake and .080" offset exhaust rockers, complete with .040" holes drilled in the fulcrum to oil the valve springs. Below are some pics of the preliminary setup:
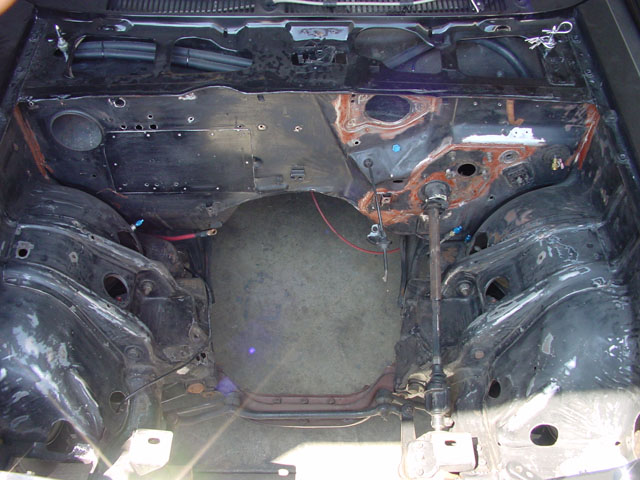
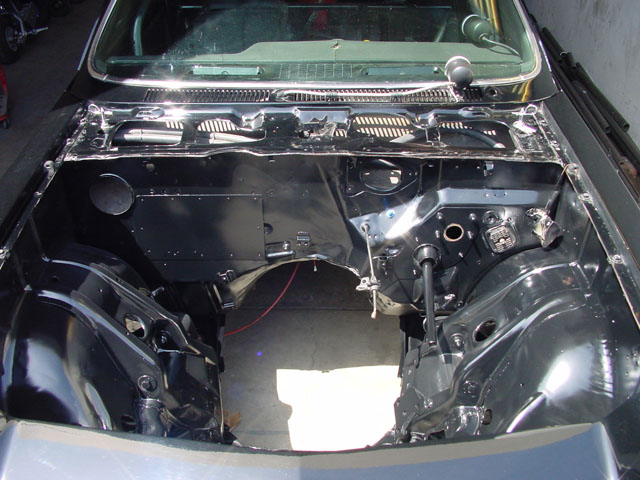
While I had the engine out, I thought it would be a good idea to clean up the grungy engine compartment and give it a fresh coat of paint. I also took the opportunity to check the fit of the new Dedenbear case since the bell housing mating flange is about 1/8" thicker than a stock case. This may not seem like much, but in a Vega chassis, it can be the difference between fitting properly and cutting holes in the firewall. . .or "clearancing" with a large hammer! While the empty trans case was in, I also marked the location of the band adjustment bolt on the tunnel. I then drilled a hole to provide access to the bolt so I could make band adjustments while the trans was in the car. I also welded the engine mounts on the frame to stiffen them up a bit. Once all the sanding, scraping, clearancing and drilling was done, I painted the compartment a nice semi-gloss black.
07.21.04
One of the things I plan on doing to the car while the engine is out is to upgrade the transmission. Not that it did not work correctly, it's just that I have been running the car without the proper safety equipment. The small transmission tunnel on the Vega is much too small to fit any type of planetary or flexplate shield over the transmission. I decided to purchase a Dedenbear case with the SFI approved flexplate shield and planetary shield built into the case. This was a perfect solution for my car because not only would it provide the proper safety shields, but it would fit in my stock tunnel since the case is the same size externally to a stock case. Since I bought my Powerglide used, I did not know what parts were used in the buildup so I decided to take it apart to see what it needed, if anything. As it turns out, the Powerglide I was using (and leaving the starting line at ~5000 RPM and 10 pounds of boost, I might add!) was basically stock, with the exception of an aftermarket Turbo-splined input shaft, the transbrake, and an enlarged converter feed circuit on the pump. Considering the abuse a transmission takes in a turbo application, especially when spooling up on the transbrake, I was somewhat surprised. Especially considering the excellent condition of the steels and clutches. I think this can be contributed to proper trans fluid temperature control. Because I have the trans cooler submerged in the ice water for the intercooler, it is virtually impossible for me to overheat the trans fluid.
Before putting all the old trans parts into the new Dedenbear case, I plan on doing a few small upgrades while it is apart. Besides all the usual lubrication circuit upgrades, I'll be adding a new hardened stator support to the pump, a roller bearing in the case, a roller bearing governor support, dual Teflon ring servo, hardened and lightened clutch hub, and a roller bearing to replace the factory pump to drum thrust washer.
07.04.04
I finally have all my engine parts back from QMP Racing. I had previously had the basic short block mocked up and all the main and rod clearances checked, but still needed the block decked, the reciprocating assembly balanced and the heads freshened up. The machining is now complete, so I can move on to the next phase of the engine buildup, mockup and assembly. I plan on taking as many pictures as possible to document the buildup and will update the site as time allows.
05.09.04
I resized all the newer pictures to 640 x 480 resolution for faster loading.
05.02.04
I've finally updated the site after falling behind for six months! I've updated the Vega's chronology below, although the dates are approximate. I did it this way to preserve the timeline of events for you the reader, as well as to keep an ongoing record of what modifications and changes I've made to the car. I often have to refer back to the site to remember when I did certain things on the car. ;) At any rate, take a look at some of the updates below. . .everything is new after the 11.10.03 update as of this writing. . .
04.18.04
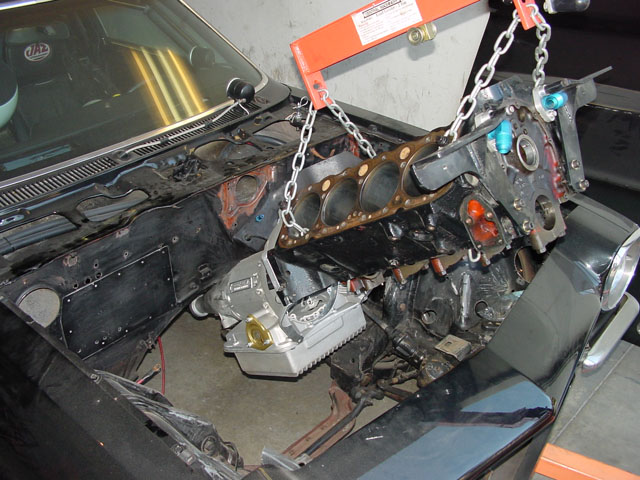
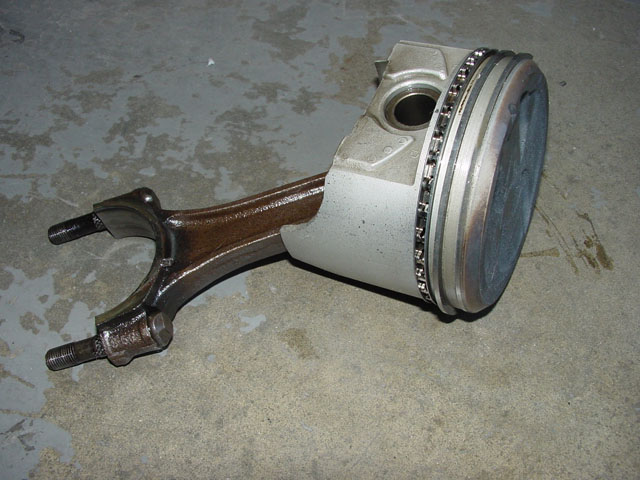
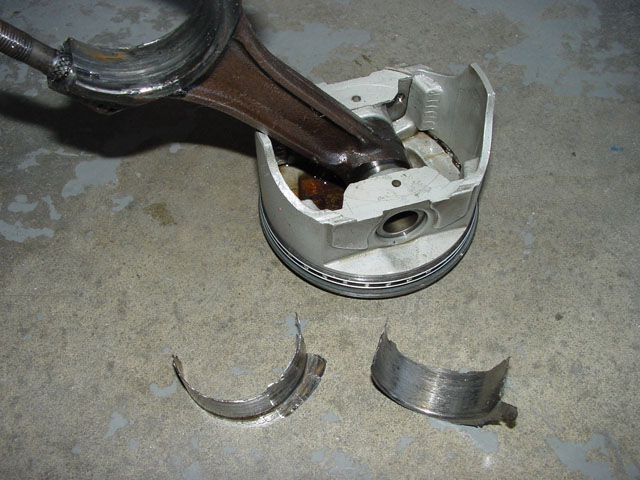
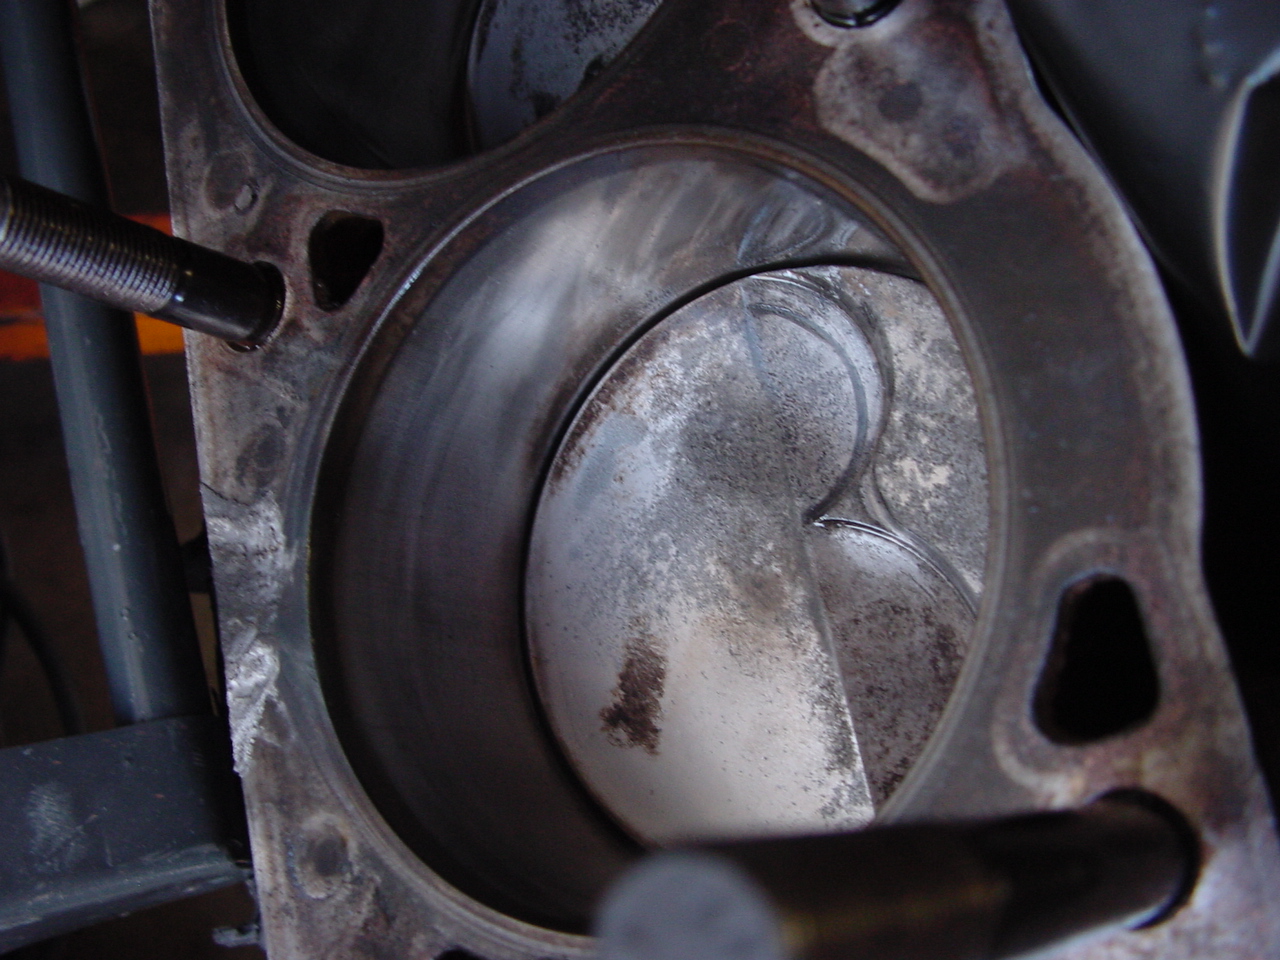
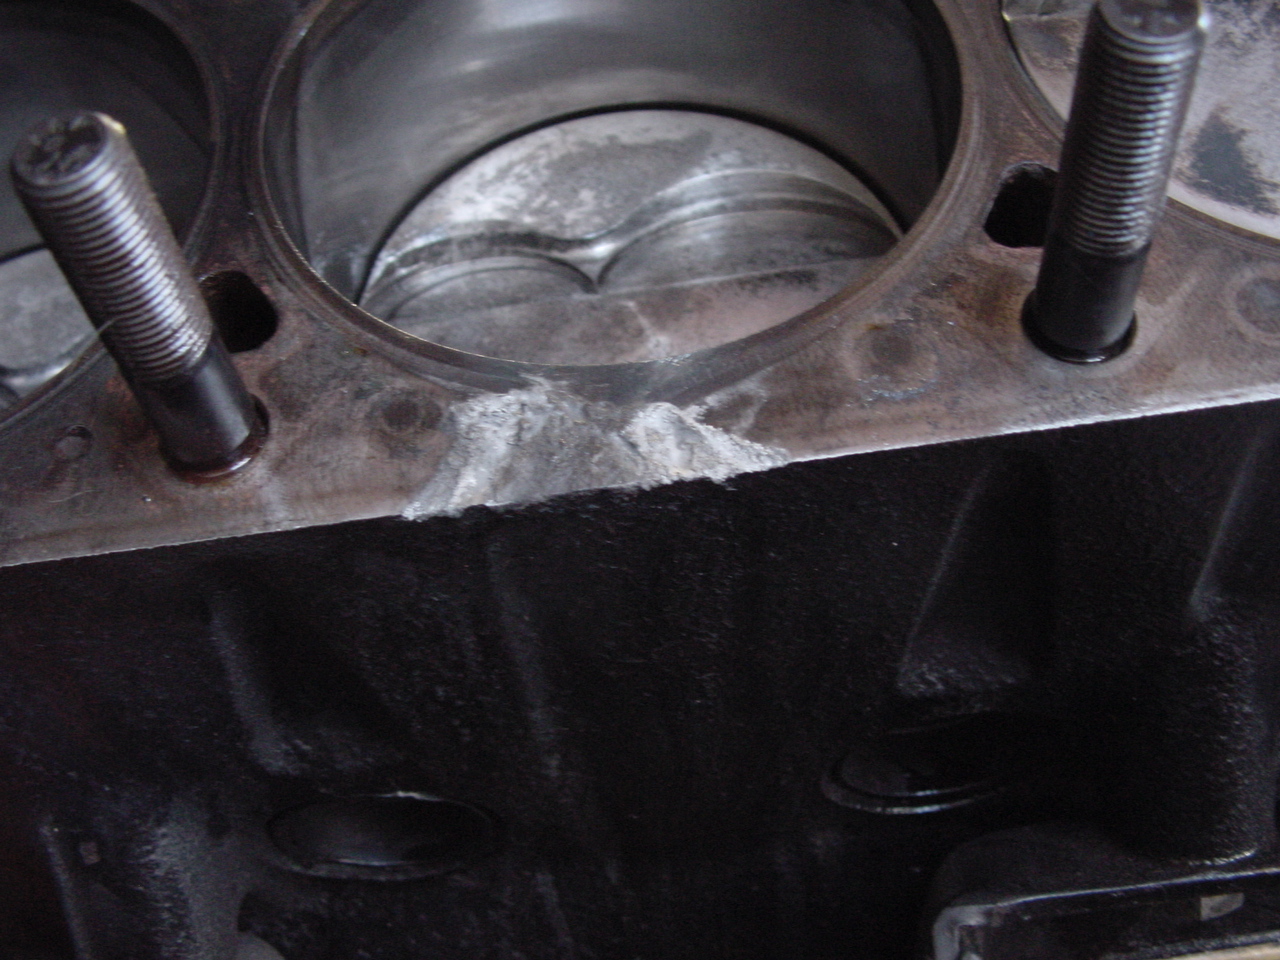
I finally got around to taking the engine and transmission out of the Vega to diagnose the knock. It turns out that the #7 rod bearing spun. Of course, the adjacent #8 rod bearing spun as well. To make matters worse, I threw a dial indicator on the #3 main journal and found the crank to be bent .020"! In addition, all the wristpins were bent! It looks like I cut my losses at the at the best possible moment. One more pass may have made me a permanent member of the "Run Over Your Crankshaft" Club! Check out he pics. . .not bad for a carbureted twin turbo SBC with cast pistons, stock rods and a stock cast crank!
04.10.04
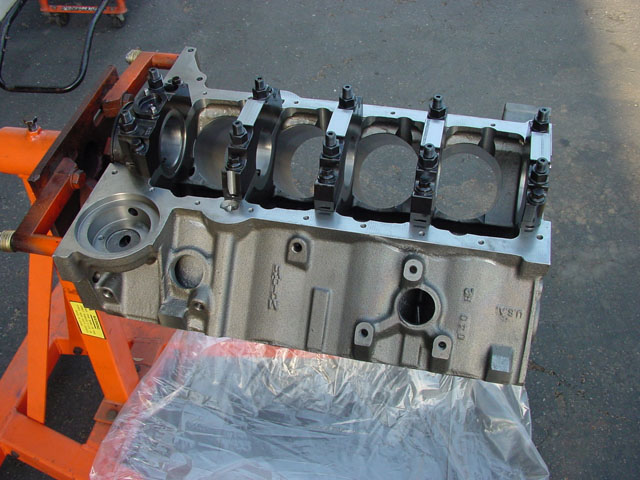
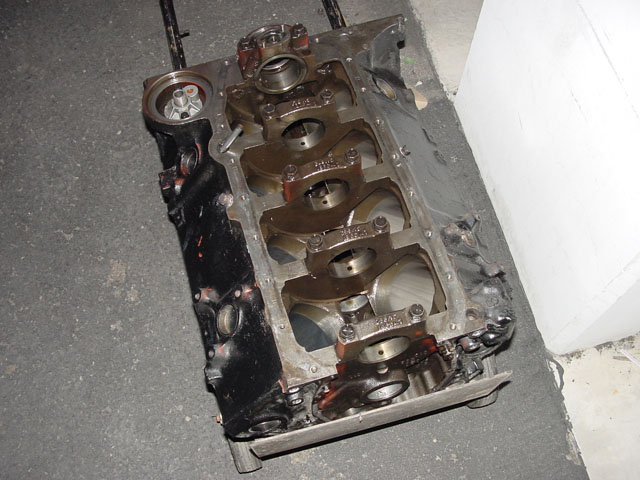
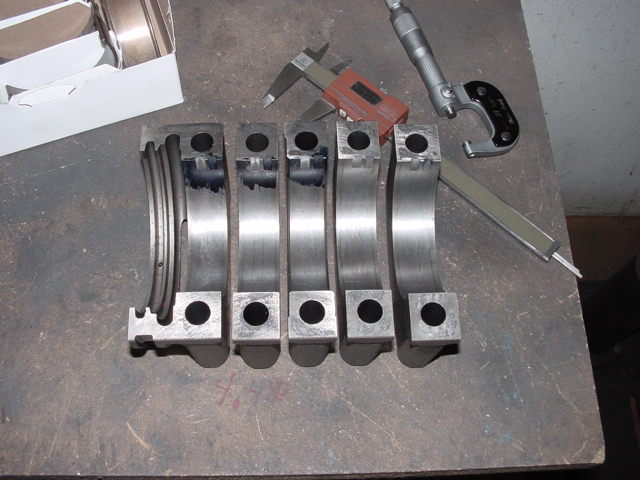
I took my block, crank, rods and pistons up to QMP Racing today to have the World Products MoTown block bored and honed. I also decided to have the Eagle crank reground and rehardened, as well as have the Eagle rods resized to ensure the components were as they should be. I also has them remove the main cap bolts that come with the block and replace them with ARP studs. This necessitated an align hone to ensure the main line was straight and round. All the parts should be back in a few weeks for trial mockup to check clearances and establish a deck height figure to determine how much to deck the block.
03.10.04
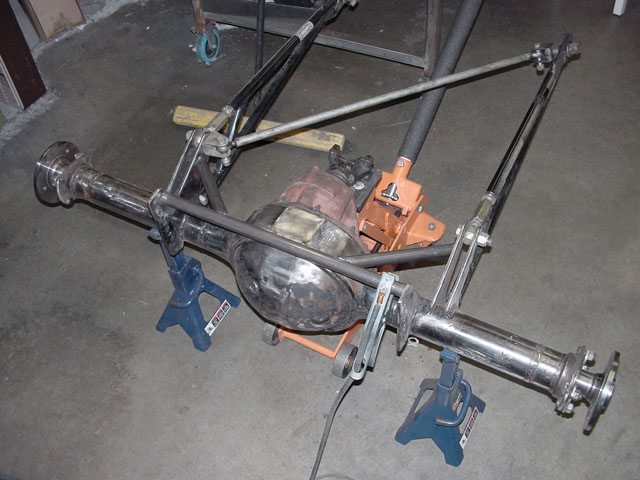
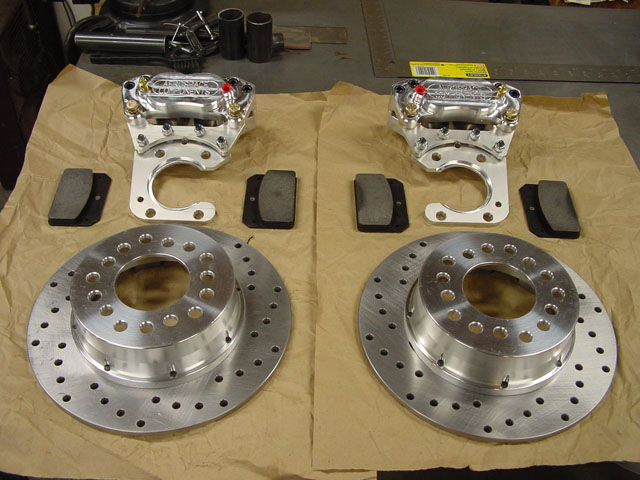
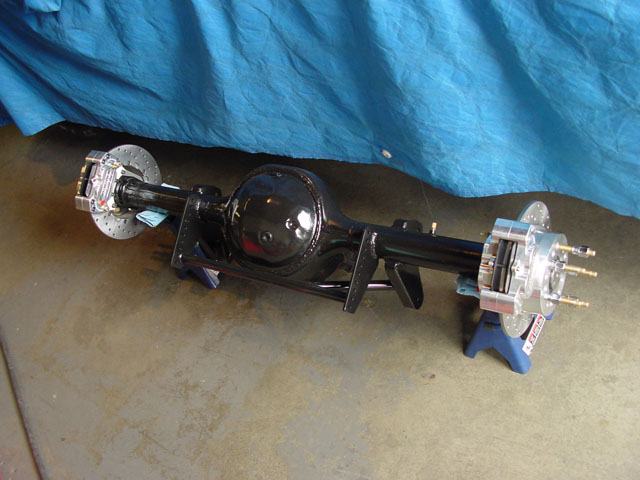
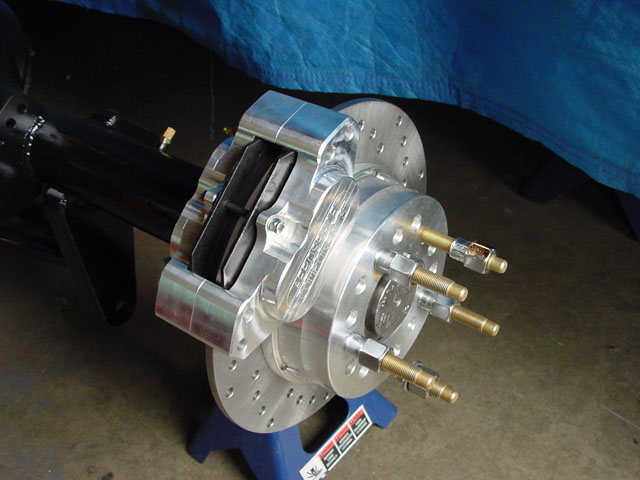
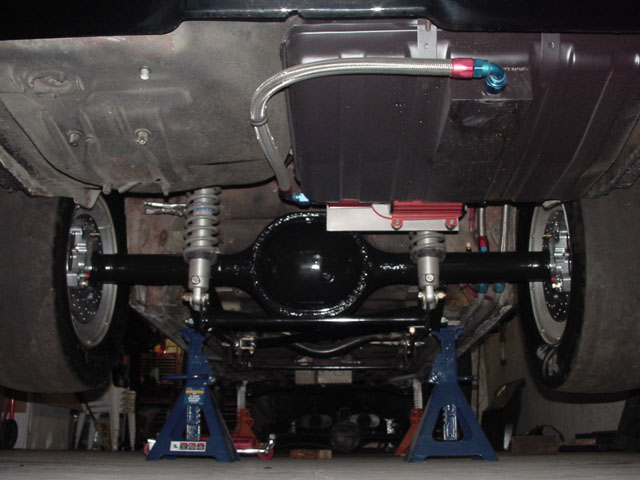
After racing the Vega and making a number of 138 mph passes, it quickly became clear to me that the drum brakes on the Ford 9" were not really up to the task. So, I bought a set of Aerospace Components rear disc brakes. The quality on the brake setup looks great. I also decided to add a few braces to the 9" housing to strengthen it up a little. I added some 1" x .095 4130N CrMo braces between the two coil-over shock mounts, and to the ladder bar brackets to stop any lateral movement. I also welded some CrMo .125" x 1" flat stock between the pairs of ladder bar brackets to the housing tube to prevent any tendency of the brackets to rotate on the housing. In addition, I fabricated a 1" x .095" track locator to replace the weaker 3/4" mild steel track locator. I replaced all the rod ends with stronger 3-piece 4130 CrMo units, and replaced all the Grade-5 hardware with either Grade-8, AN or NAS bolts for added security. Check out the pics:
01.04.04
The annual Hangover Nationals went off without a hitch. . .but not without hangovers! I was finally able to finish off my NHRA competition license by making two sub-ten second passes in the Vega. I ran a string of low 9.80 runs with the fastest being 9.82 @ 138! This was with 15 psi boost with the old beater stock shortblock! The incremental times on the run was as follows:
60' - 1.460
330' - 4.100
1/8mi - 6.301
1/8mph - 111.70
1000' - 8.153
1/4mi - 9.829
1/4mph - 138.21
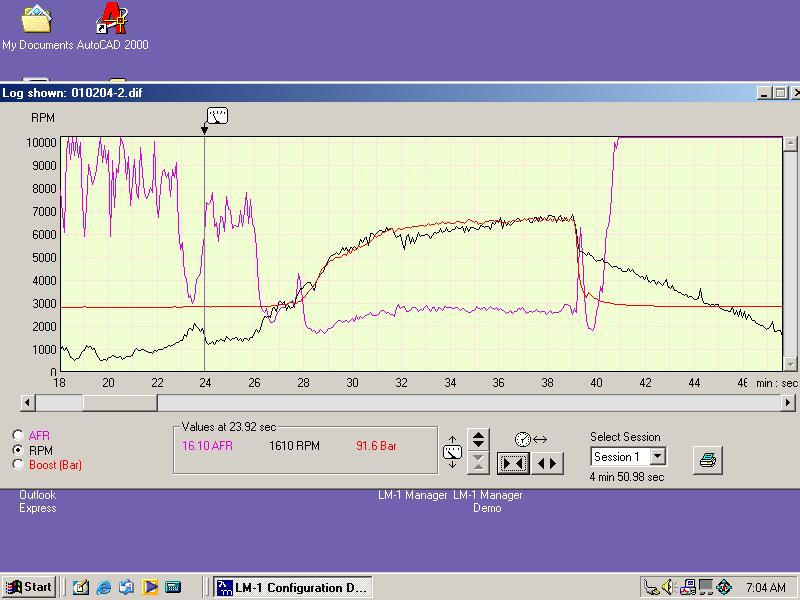
The car was running very well. The small 26 x 8.5 M/T slick never cease to amaze me. 1.46-1.47 60' times were the norm all weekend. The carb, as it did the last time out, continues to run flawlessly. The AFR with the carburetor never got above ~11.5 according to the datalogger on the Innovate Motorsports LM-1 wideband O2 meter. Check out a screenshot of the datalog below:
Unfortunately, the first pass on the third day was the last the Vega would make for the weekend. It was a hard, clean run, but the engine sounded a bit funny on deceleration. After I got on the return road, I noticed a very slight engine knock around 2000 rpm. It almost sounded like a miss. I picked up my timeslip at the timing shack to find out I ran a 10.10 @ 134. . .a bit slower than I had been running. By now I knew the knock was not just a misfire. I rolled into the pits and hopped out to listen to the knock. It sounded very deep in the engine, and only audible above 2000 rpm. I decided to call it quits. This engine had performed well above and beyond any of my expectations! It got me my NHRA license and ran long enough to get the carburetor dialed in. Time to put the old lass out to pasture.
12.26.03
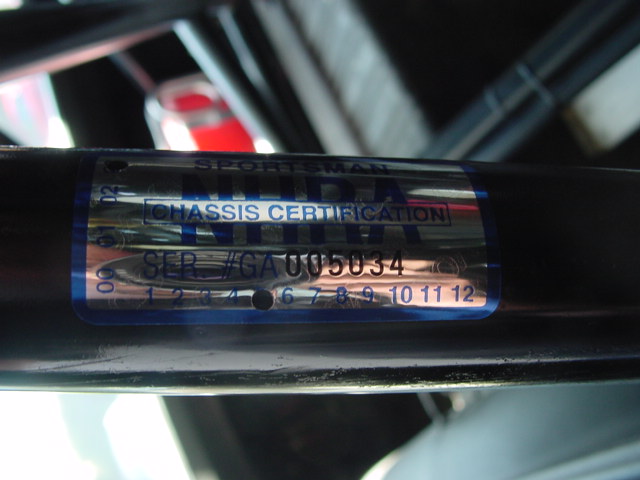
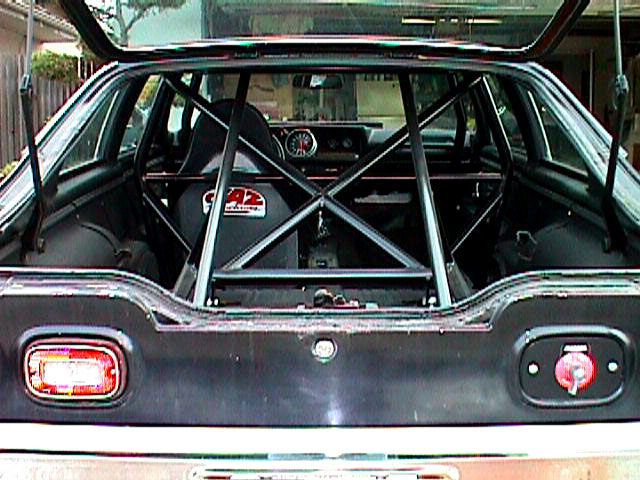
The Vega is finally ready for the "Hangover Nationals" held every New Year's Eve/Day at Los Angeles County Raceway. If you recall, last year I was not allowed to make full passes over 135 mph because the car (as well as the driver) was not legal to run an ET faster than 9.99 or faster than 135 mph. I've spent all year getting everything ready so that the car will be legal, along with some other minor tech issues. The first thing I had to do was get a NHRA chassis certification for the rollcage. Before I could get the cert I had to add a couple bars to the cage, as well as 4 gussets to the "halo" portion of the 'cage. I was a bit worried about the 'cage not passing certification because I built it using .120" wall ERW tubing. NHRA mandates that all mild steel tubing must be a minimum of .117" thickness. The problem with using .120" ERW is that it does not always maintain a constant wall thickness like DOM tubing, which means the tubes may check undersize when the inspector checks it for thickness with a sonic tester. If the rollcage did not pass cert, I would have to cut it all out and fabricate a new one.
However, all was well when the local chassis inspector came out to check the car. He checked every tube in the car, and they all checked at .118". Whew! You can see the gussets I added, as well as the chassis certification sticker below:
Now that the car was legal to run faster than 9.99, I had to work on getting the driver legal! The first thing I had to do was get new safety gear. Anyone running faster than 9.99 or 135 mph must wear a SFI 3.2A/5 spec fire jacket and pants, along with SFI approved gloves and a neck collar. I purchased all my safety gear from Simpson. I also upgraded my helmet from an open face style to a Simpson Super Bandit closed face helmet. I just wanted a little extra insurance. As the saying goes. . .a $10 helmet for a $10 head!
I also had to get an NHRA competition license. This required getting an FAA style physical exam by a doctor, and making six passes in the car at an NHRA sanctioned track, with the track manager and two NHRA licensed drivers as witnesses. Earlier in the year, a group of us rented a local 1/8th mile track for the day. It was at this time that I started working on getting my license. I had scheduled a physical exam at my doctor's office a few weeks prior, so I was ready to begin making my license runs. The procedure for the six runs goes something like this: two passes to the 60-100' mark, two half-track passes, and two full passes. The last two passes have to be at least as fast as the minimum requirement for the license. So for a Sportsman/Super Gas license, you must run at least 9.99 in the 1/4 mile or 6.39 in the 1/8 mile.
I did my first four passes during the track rental day we had at Irwindale Dragstrip in July. I tried to get my last two full passes completed, but by the time I got the first four done, the surface temperature of the track was approaching 150°F and the Vega's little slicks could just not get any traction. After three tried with the car skating all over the track for the first 330', I decided to call it quits before I stuffed the car into the wall. I would have to complete my final two runs at LACR during the Hangover Nationals.
11.22.03
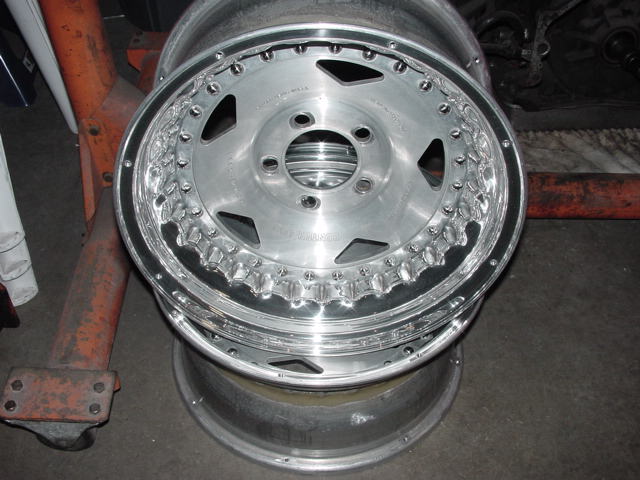
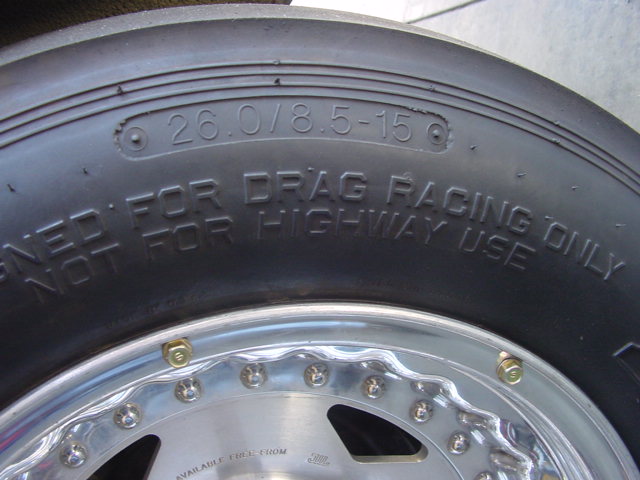
The last time I had the Vega out, the tires were rotating a bit on the rims. Every launch on the transbrake caused the tire to spin about 1" on the rim. To prevent tearing the tubes, I had to rotate the slicks side to side every other pass. So, I decided to install a set of rim screws to prevent any problems in the future. I installed 16 screws per wheel, 8 per side. Below are a couple pics. One shows the wheels after drilling the holes, and the other is a close up shot of the screws, along with the ridiculously small tire size. ;)
11.10.03
I ordered a wideband O2 meter from Innovate Motorsports today. From the research I've done on the web, it looks to be the be the best deal out there for an accurate WBO2. It will datalog up to 44 minutes of WBO2 data, along with 5 other channels (including RPM) if you use the optional input cable. I'll let you know how well it works after the New Year.
10.25.03
Again, lagging on the site updates. I've been collecting parts for the Vega's new short block little by little. I now have everything to complete the new short block, with the exception of gaskets. I hope to start on the new engine after the first of the year. In the meantime, I'm getting the car ready for another trip to the "Hangover Nationals" over New Years.
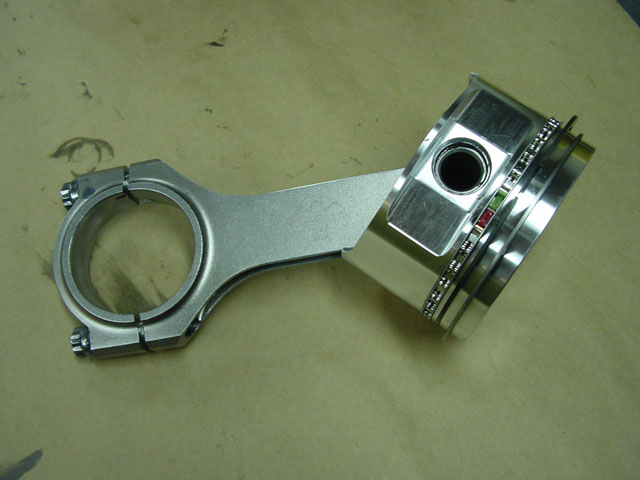
Here's a list of the major engine pars I have so far:
Block: World Products Motown Race block, rough bored to 3.990
Crank: Eagle 4340 non-twist forging. 3.48" Stroke
Rods: Eagle H-Beam with L-19 bolts, 5.700"
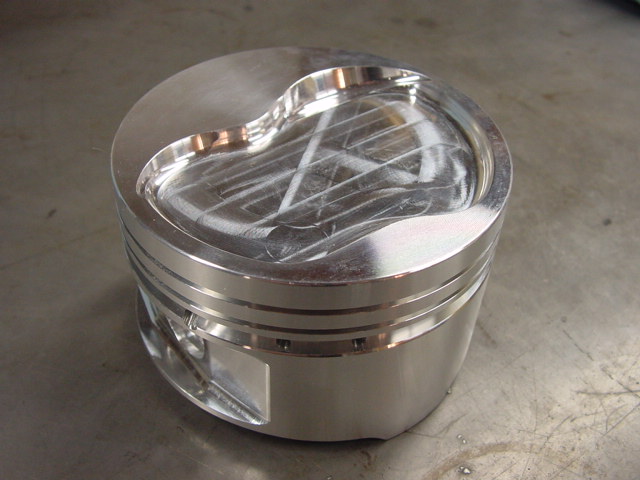
Pistons: JE Extreme Duty, HD Pins, 4.020 bore, -22cc dish
Rings: Speed-Pro, 1/16-1/16-3/16
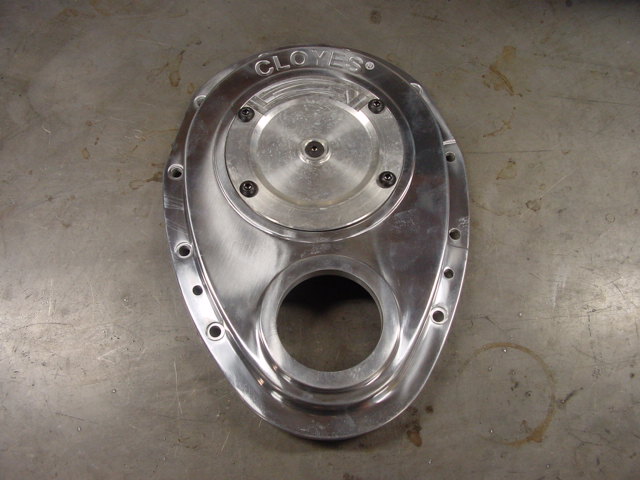
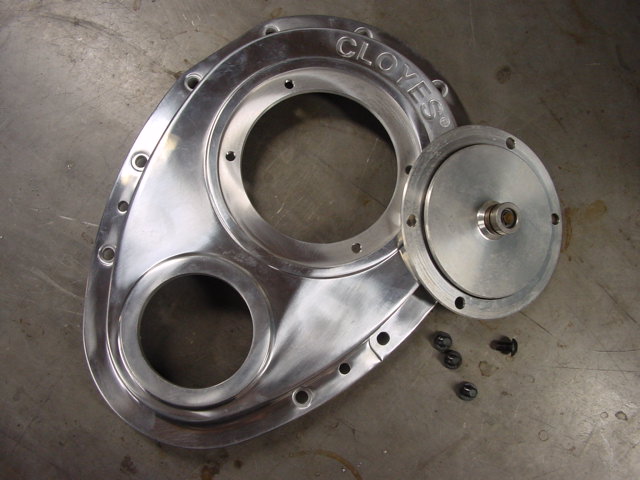
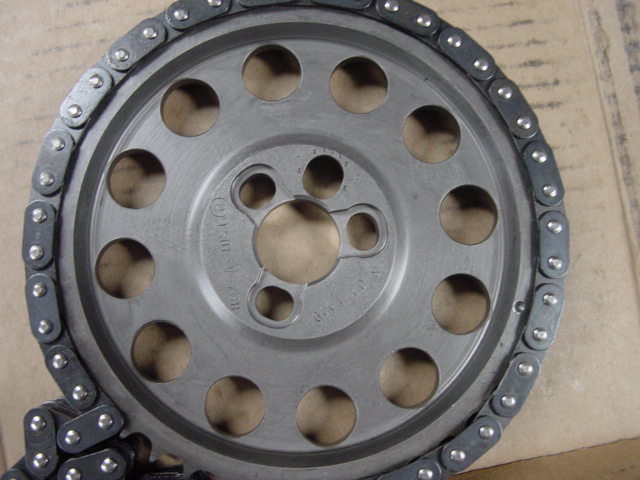
Cam Drive: Cloyes Hex-A-Just with 2-piece cover
Oil Pan/Pump: Milodon deep pan, Melling M55HV pump
Here are a few pics of the parts:

09.03.03
As usual, I've been lagging behind on the website updates. I've finally added all the pictures to the blowthrough carb article, as well as some additional text that was inadvertently left out of the original version. Click the "Tech" button to the left to view the article.
08.14.03
I uploaded a new blowthrough carburetor how-to article up on the tech page. Click on the "Tech" hover button to the left to view the article. Only the text portion of the article is completed. I hope to organize and upload the pics shortly.
01.15.03
As you can see from the picture below, we finally got the Vega running and down the racetrack. WooHoo! The first pass off the trailer was a little nerve racking, as I had no idea what would happen. I wasn't even sure if the cast pistons would survive the 6-8psi that the wastegates were supposed to be set for. Well, it turns out the pistons could survive, as the turbos were pushing 16psi through the traps!
First
pass off the trailer, leaving off idle I ran something like an 11.50 at 106 mph.
I was in and out of the throttle because I saw the car was boosting 10-13 psi.
Keep in mind this shortblock is a 355" SBC with cast pistons, cast crank, stock
rods/bolts, and a 2-bolt block that has over 500 passes on it, in addition to
about 20,000 street miles. I was a little nervous running more than 6 psi, but
what the hell, this engine has never given me a single problem in the 12 years
I've owned it.
Second pass, left the line on the footbrake at about 1500rpm. I stabbed the gas
and it stumbled bad (60' was a 3.19!) then pulled hard for a 12.49 at 135 mph!
This was without the water-to-air intercooler because I forgot to flip the pump
switch on.
Third pass, I left off the transbrake with about 1psi of boost and the car cut a
60' of 1.68. On this pass I stayed in it all the way to the finish line and ran
10.14 at 138 mph. . .and I forgot to turn the intercooler pump on again. Dumbass.
This pass I looked at the boost gauge as I crossed the finish line and noticed
it was pulling 16 pounds of boost! Not good for a cast piston motor! The track
officials also informed me that if I made another pass that fast without the
proper safety gear (gloves, neck collar, 3 layer fire suit. . .I only have a
single layer jacket) or a chassis cert/comp license I would be booted from the
track. I had to run half passes for the remaining two days. This was probably a
good thing considering the cast pistons!
On my last pass of the third day, I put it on the transbrake and let it build
5-6 psi. I left the line with a 1.47 60' and stayed in it until the 1000'-1100'
mark. It ran a 10.10 at 111 mph in the 1/4 with a 6.31 at 113 in the 1/8th mile!

12.7.02
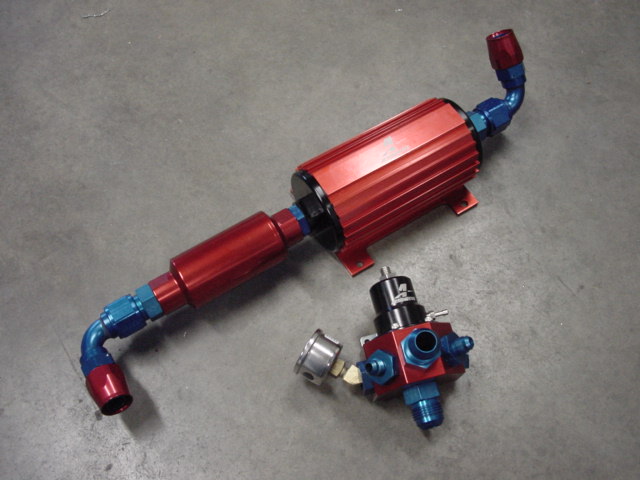
I finally finished the new fuel system. I ended up using all Aeromotive components, and am very happy with their quality and performance. I also welded a sump onto the stock tank Here's the breakdown of the entire fuel system:
Inline Filter P/N 12304
Return style regulator P/N 13202
EFI Pump P/N 11101
-12 feed line from tank to pump
3/4" line from pump to regulator
2 -6 lines from regulator to carb
3/4" return line
A couple of pics of the fuel system and fuel tank sump construction:

11.16.02
The Vega finally runs! The cam was broken in without any problems, and it seems the oil drains coming off the turbos are working well. The remote mounted CSI electric water pump along with the Griffin aluminum radiator are keeping things nice and cool, even with the downpipes running between the radiator and the engine. With about a 68°F ambient temperature, I can shut the car off after running about 180° and run the water pump and fans to cool the water jacket temperature to about 120° in 5 minutes. Hopefully it will stay cool while on boost!
The entire fuel system has to be redone, including a sump welded into the stock tank before the Vega will see any boost. Some machine work still needs to be completed on the intercooler as well.
10.25.02
It's been a long time since an update! In typical fashion, the Vega is not yet running. All that needs to be done now is to wire up a few accessories and run the transmission cooler lines. Then the new cam can be broken in. A new fuel system will have to be fabricated before the engine can see any boost, but the old system will be sufficient to get the cam broken in. Below are a few pics of the car, as well as a shot of the hood, since I've had a few emails asking what kind of hood was going to cover the intercooler.
07.29.02
Well, the Vega's engine is back together! Only a few mare odds and ends need to be done before the engine can be reinstalled. This weekend, the aluminum lines to connect the remote mounted CSI electric water pump were finished. Click on any of the photos for a larger image. Some of these images were taken in high resolution, so it may take a little while to load.
07.26.02
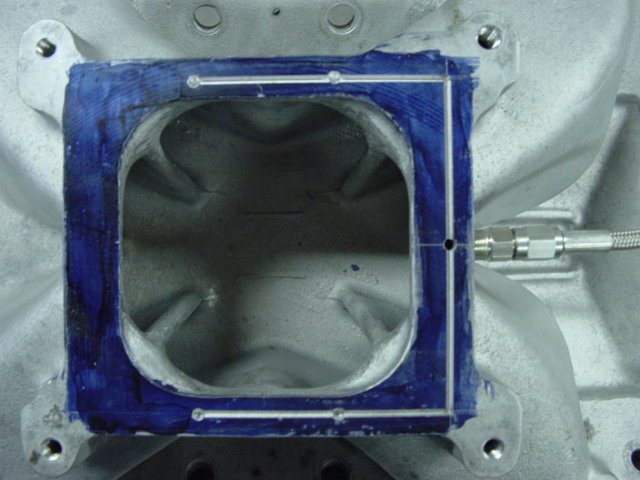
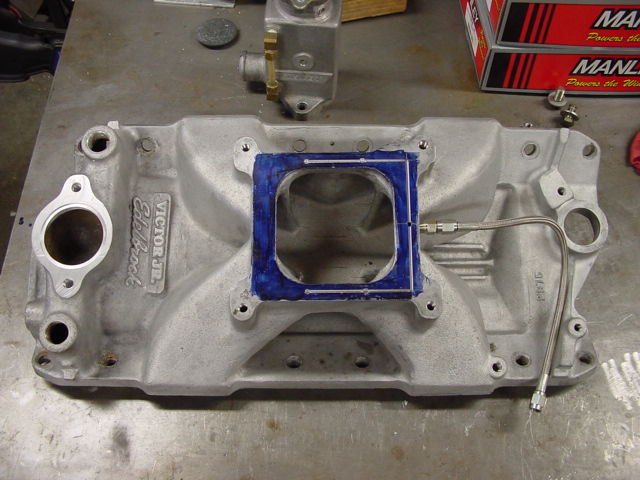
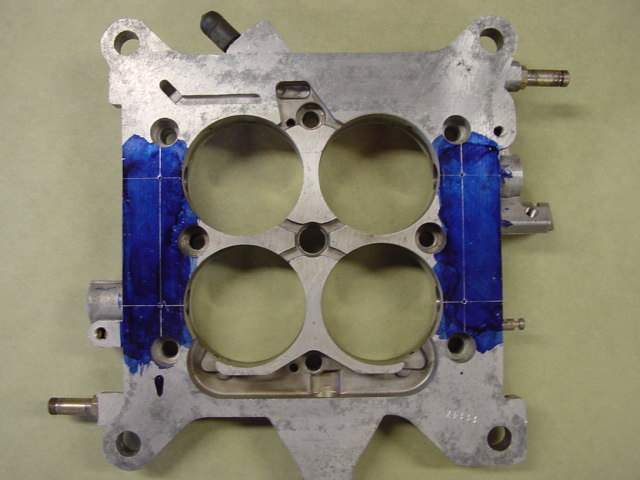
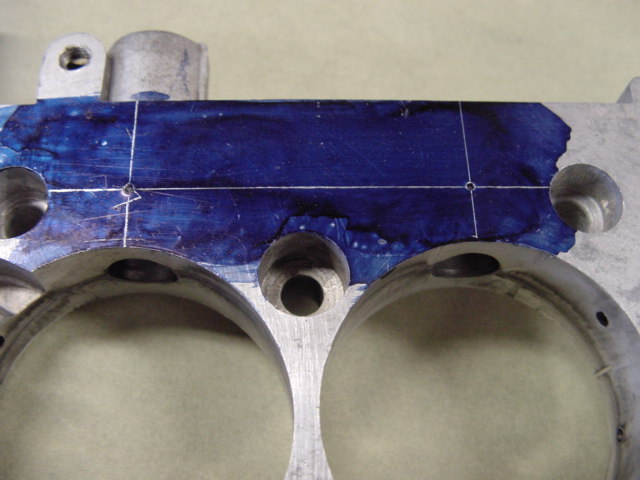
Below are some quick pictures taken as the Vega's manifold was modified to boost reference the carburetor throttle shafts so fuel won't leak out while on boost. A hole was drilled down into the carb mounting flange to intersect with another hole on the backside of the pad that is drilled and tapped 1/8" NPT. This will be the source of boost with a -3AN line going to the carb hat/intercooler. Four other holes are drilled into the carb mounting flange that correspond with matching holes that will be drilled in the carburetor baseplate. Then, a slot was milled to connect all the holes on the mounting flange. Of course, a carb gasket will have to be modified so the matching holes in the carb baseplate will intersect with the holes on the manifold's carb flange. See the pictures below for details.


07.03.02
We're straying from our original plans on the Vega engine just a bit. We are reassembling the old engine just as it was, in order to make sure there are no leaks, and to make sure the Hangar18 fabricated cooling system and turbocharger oil drains function properly. For anyone on the SoCal area, we are planning on bringing the Vega, as well as the '67 Fairlane, to the Great Labor Day Cruise at the Orange County Fairgrounds. After Labor Day will be the thrash to get the new engine together before the annual "Hangover Nationals" at Los Angeles County Raceway from December 30, 2002-January 1, 2003. A brand new Eagle 4340 3.48 stroke crank, and a set of Eagle ESP H-beam rods with L-19 rod bolts are on order. We hope to pick up a new World Products MoTown block in the next couple weeks to round out the engine. Guess it's time to design a cam. . .
06.01.02
We pulled the engine out last weekend to weld turbocharger oil drain bungs onto the oil pan, and to install the PowerGlide. You can see it mocked up on the stand here. While the engine is out, the head gaskets will be replaced with standard FelPro #1003's. We were planning on running the existing cam, just to get the car running, check for leaks and to make sure radiant heat from the turbine housings wouldn't melt anything. As it turns out, the cam had some bad pitting near the nose of the cam (the take-on side), so I have decided to replace it with a more turbo friendly grind while the engine is out.
Right now, the heads have been completely disassembled and cleaned. While disassembled, we'll clean up the ports and combustion chambers from the previous port job. The exhaust valves have carbon pitting, so they'll need to go out to the machine shop for a quick regrind.
05.17.02
Well, it's been a while since a real update! The basic turbo setup on the Vega is finished, all that needs to be done is a few odds and ends. . .
12.05.01
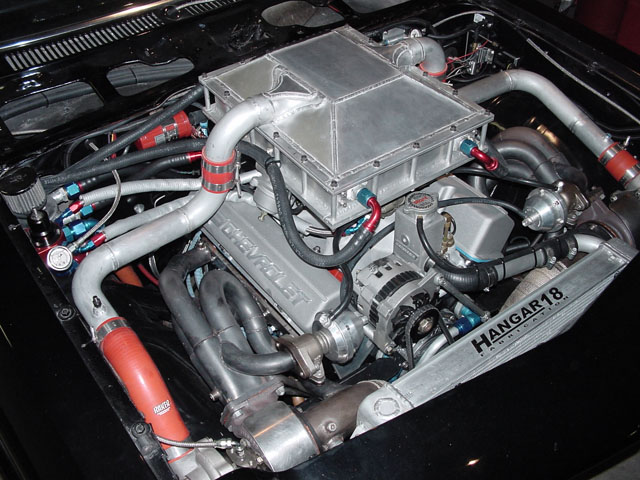
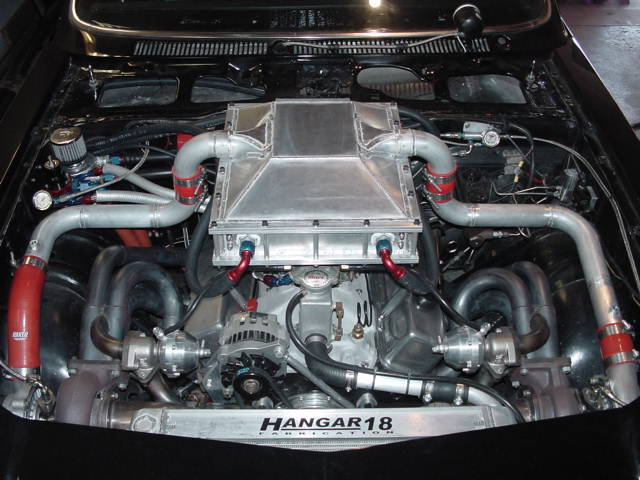
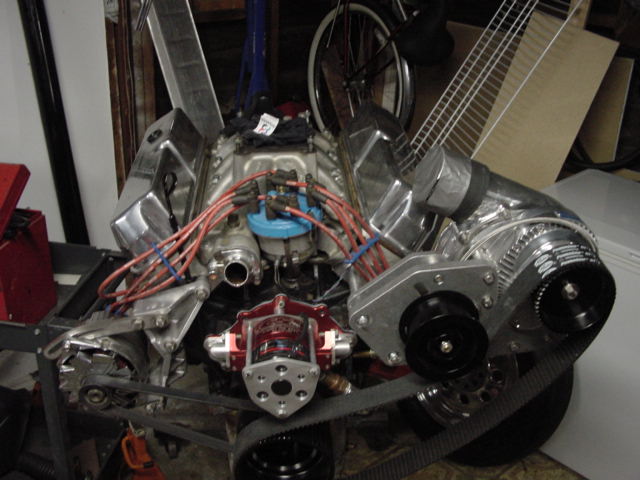
The Vega is going twin turbo! We got a deal on two brand new turbos that we couldn't refuse! Both turbo headers have already been fabricated for the two T04B H3/P trim turbos, but the Tial wastegates need to be plumbed in. The current project is a water-to-air charge cooler that sits on top of the carb (that's right, this will be a blowthrough setup. . .more on that later!) much like the Vortech Mondo Igloo® cooler. . .but for about $2000 less!
Preliminary calculations put the flow of our cooler at about 1800 cfm with a Delta P of ~1.5! We'll have more info on the cooler, as well as the rest of the setup in 2-3 weeks, so be sure to check back! For now, check out the some pics of the project below.
The work in progress. . .
The Vega's tubular rear frame and rollcage.
A couple shots of the passenger side header right before the collector was welded on.

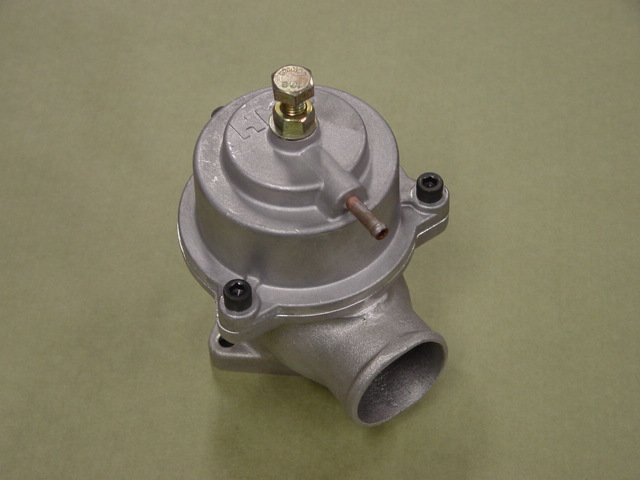
One of the Tial 35mm wastegates. One of the 2 HKS bypass valves the Vega will use.
Below are a couple pics of the whole driver's side header and TO4B turbo off the car
while I was welding the wastegate flange. The split in the flange is to allow the header to be
removed without removing the steering shaft.
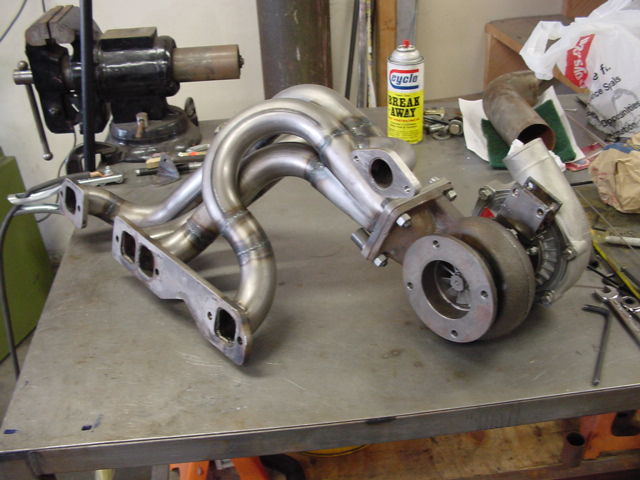
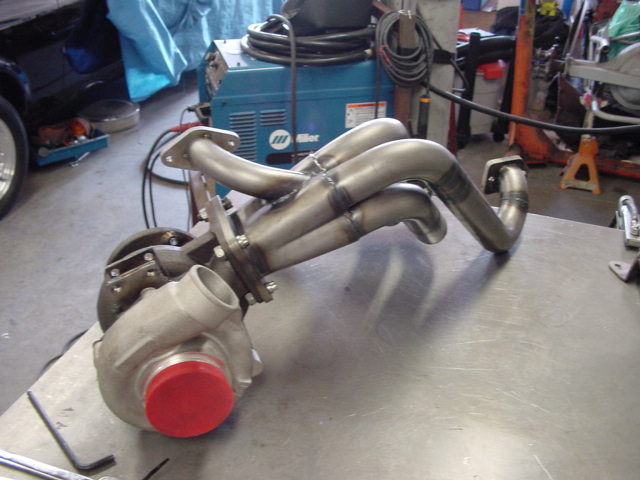

Detail of the driver's side turbo, header and wastegate assembly.
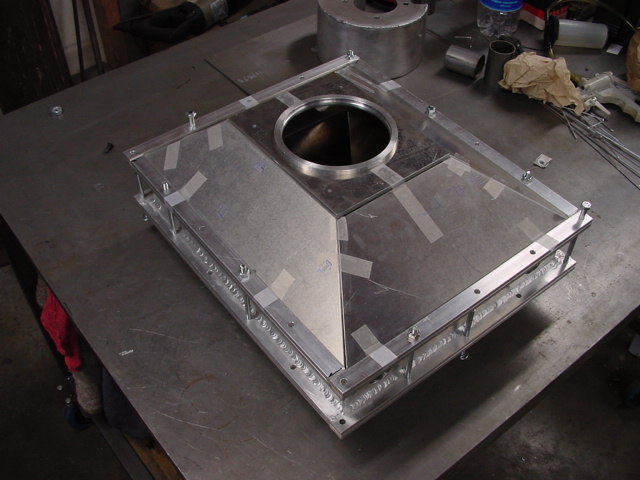
Mocking up the bottom of the water-to-air intercooler. If you notice, the cooler is not
symmetrical front-to-back. I had to modify my original CAD design to clear the hood.
This is why all the parts I make are designed on the computer first!
Trial fitting the water-to-air intercooler for hood clearance before welding and machining.

The nearly completed water-to-air intercooler. Fabricating the aluminum ducting to
the intercooler is next on the agenda. I get my aluminum bends from Burns Stainless.
Their mandrel bends are a bit pricey, but are very high quality.
Update!
01.26.03
I snapped a few shots of the Fairlanes disassembled engine today. It looks like cylinder #2 went lean, and the FelPro Loc-Wire gasket just couldn't hold. Consequently, the combustion gasses burned a 3/8" deep trench in the head, and pitted deck on the block about 1/16".
01.04.03
Here's Kevin in the staging lanes, waiting to make a license pass.
08.11.02
I snapped a few pics of the main caps out of the Fairlane's engine while Hangar18 Fabrication was machining them for the post-'76 bearings. Check out the pictures below.

07.29.02
While the engine was out of the Fairlane, we decided to check things out a bit. . .and we did not like what we found! The first thing we noticed when the pan came off was pitting on the roller cam. The cam was taken back to Isky, where they performed a Rockwell test . It seems the cam is on the low side of the acceptable hardness range, so a new steel billet will have to be ground. Next, the main caps came off and the bearings did not look too good. The appear to have fatigued somewhat (probably from BigShot nitrous system) pulling the babbitt off the bearing surface. The decision was made to re-bearing the engine. The previous bearings were Federal-Mogul competition bearings, but with a fully grooved main bearing (factory style). Upon calling the local speed shop for a 3/4 groove design, we found that a 3/4, or even a 1/2 groove main bearing is not available for pre-'77 351W! Because Ford changed the location of the bearing tang receiver groove on the main cap, we now have to machine a new receiver groove on the caps to fit the later bearing design so a 3/4 groove main bearing can be used (the mains in the block are the same for all years of 351W). We also noticed some fretting on the main caps, so it appears the have been "walking" some.
07.15.02
The '67 Fairlane has been fitted with a D2R ProCharger! The initial plan is to blow-through a 1050 Dominator. . .on methanol! Getting the car running is the first order of business, as well as some serious R&D, so it will be a little while before we get any performance numbers. While the engine is out, we've modified the shock tower to add a little more clearance for the blower inlet. See the pics below for some of the work that was done to facilitate the install.
Here we have Mike tig welding the modified shock tower, as well as a shot of the finished product.
A couple pictures of the CSI water pump that was modified to clear the blower crank pulley.
On the Ford front, our '67 Ford Fairlane has its new 410 CI Windsor motor finished! The engine consists of a '70 351W block with a half-fill of hardblock, a 4" stroke 4340 Eagle crank, 6.345" Manley Super 70 rods, and JE pistons for 13:1 compression. The heads are Joe Sherman ported Edelbrock Victor Jr. heads, with a Victor Jr. intake and 1050 Dominator. . .along with a NOS Big Shot plate system!